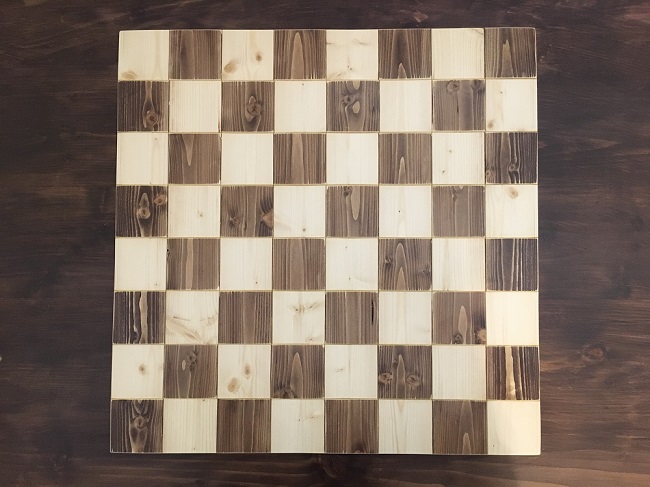
Chess boards are great woodworking projects for beginners because they’re relatively simple and quick to make. They can often be made in just a few days if you use the right materials. Generally people use two different species of wood, one light and one dark, to achieve the contrast needed for the checker pattern. Common woods for the dark squares are walnut and mahogany, and the light squares are often made from maple.
These hardwoods can be expensive for someone just starting out with woodworking, or anyone who’s on a tight budget. A cheap alternative to using naturally dark wood species is to use a dark stain on pine. For the light squares you can simply leave the pine unstained and it’s natural color is already light enough. This will give you the contrast you need to make a chess board, but it also complicates the process.
If you want to build a chess board out of a soft wood like pine, then you have to be aware that it probably won’t turn out as nice as one made from hardwoods. The main issue is with the stain. With woods that are naturally dark, you can sand them as much as you want because the color is the same through out the wood. But stain only colors the surface of the wood, so this means that you can’t sand it much after you stain it or the color will be removed. This makes it very difficult to get a flat, smooth surface on your chess board.
This doesn’t mean that you can’t or shouldn’t make a chess board out of softwood. Even though it probably won’t be as smooth as one made from hardwood, it can still function as a chess board. They can even have a rustic appearance that hardwood chess boards lack.
Keep in mind that there are many ways you could make a pine chess board, and this is just how I made mine. I used simple tools that most beginner woodworkers probably already have, but if you don’t have some of these tools, don’t worry. Some of them can probably be rented from hardware stores, or maybe there’s a community workshop or maker space in your area that has some.
Materials/Tools
- 1×4 Pine Boards (Or any other softwood)
- Wood Stain (Preferably dark)
- Wood Glue
- Varnish (Polyurethane in my case)
- Table Saw
- Random Orbital Sander
- Sandpaper (80-220 grit)
Cutting the Boards to Length
The first step in making the pine chess board is to cut the boards to length. To find out how long your boards need to be, you first need to decide how big you want your squares to be. If you want your chess board to be regulation size, then the squares should be between 2 and 2 ½ inches wide. The United States Chess Federation standard is 2 ¼ inches, so that’s how big I made mine.
Once you decide how big your squares will be, multiply that measurement by 8. Then find the thickness of the saw blade on your table saw and multiply that by 7, because you’ll be making 7 cuts later on, and each cut will consume the blade’s thickness worth of material. If you don’t allow for that, then you’ll end up with too little material by the time you’re done cutting.
In my case, the width of my saw blade times 7 is roughly 5/8 of an inch. The eight squares add up to 18 inches, so I need my boards to be at least 18 and 5/8 inches long. I rounded it up to 20 inches just to give myself even more wiggle room.
I cut all my boards out with a miter saw, but you could use any kind of saw. Once your boards are all cut to length, the next step is to cut them to width.
Cutting to Width
To cut your boards to width, the easiest tool to use is a table saw. It’s important that the boards fit together perfectly without any gaps, so the first step is to joint one side of each board. If you’re like me and don’t have a jointer, then you can use a table saw like a jointer by using a jointing jig. They’re relatively easy to make, here’s a video tutorial on how to make one. There are a few other methods to joint a board without a jointer, so if you don’t like the jointing jig method then then check out this video.
Once you have one side on each board jointed, you can run them through the table saw to get them to their final width. You might want to leave a bit of extra material on the two boards that will be on the outer edges of the chess board though, to allow for sanding later on. I forgot about that when I cut my boards to width, and it honestly didn’t make much of a noticeable difference, but you might want to.
Flattening
Once you have all of the boards cut to length and width, the next step is to get them as flat and even as possible. In my opinion this is the trickiest part about making a pine chess board. The boards all need to be flattened and sanded before the assembly, which is difficult to do when they’re not attached together. Normally you could just flatten and smooth the board after it’s assembled, but in this case that has to happen before the stain is applied.
Maybe you’ll get lucky and all of your boards will already be perfectly flat after you cut them. In most cases though, you’re going to have some boards that are twisted, cupped, or bowed. For me, half of my boards were flat and the other half were twisted.
There are a lot of methods out there for flattening boards, but most of them don’t apply very well to thin boards. If you have access to a planer then that would work well, but I didn’t have one. To use a planer to flatten a twisted board you can shim the corners until it doesn’t wobble, and then run it through. Just make sure that the shims are very secure. Here’s a good video that explains the process.
If you’re like me and don’t have a planer, then there are still some options. I thought about using a router flattening jig, but I thought that it wouldn’t work on multiple boards that aren’t attached together. It might be possible though to use the jig to flatten each board separately. I didn’t try it but it would probably work well.
What I ended up doing, and this probably wasn’t the fastest or easiest way, was just to sand the surface as flat as I could with a random orbital sander. I taped all the boards down to a flat workbench and shimmed the wobbly ones, then sanded with 40 grit sandpaper until I had one flat surface. Then I flipped them over and flattened the other side. This ended up taking multiple hours, and it was difficult to get it flat. In the end I never got it perfectly flat, but decided that it was good enough.
If I had to do it again I would just use the router flattening jig on each individual board, or find a way to secure them temporarily and flatten them all at once. Doing it by hand with a sander is much slower and less accurate.
Sanding
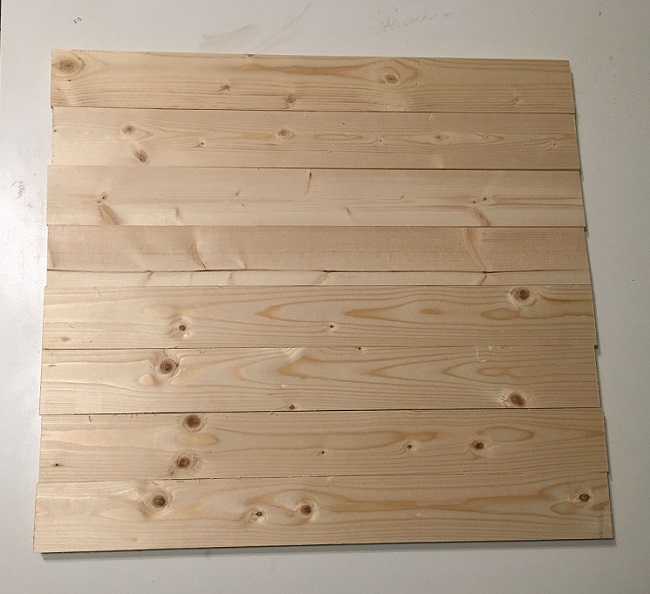
How ever you decide to do it, once you have the boards flat and even, you can sand the top to it’s final smoothness. If you haven’t already decided which sides you want to show on the top, now is the time. Look at each board to see which side has the nicer grain pattern, or any knots that you want to highlight or hide.
You might also want to consider the orientation of each board. If you orient each board so that the growth ring patterns on the end alternate, then you should have less problems with warping later on. Other wise, if too many of the boards are oriented so that the growth rings face the same way, then the board could tend to warp in one direction over time.
Once you’ve decided on the arrangement of the boards, the sanding process itself is simple. Start with a low grit like 60 or 80 grit sandpaper, and sand in the direction of the grain. After the entire surface feels smoother than when you started, switch to the next highest grit. Repeat that process until you reach your desired smoothness.
Because I knew that my board would probably end up slightly uneven, and I knew that I wouldn’t be able to sand it when I was done, I decided to round the edges of my boards. That way any edges that didn’t meet up perfectly wouldn’t stick out sharply, but be rounded over instead. Even if you get your boards perfectly flat and the same thickness, it’s still possible that pieces will slip out of place during the glue up.
Staining
After your boards have been sanded to their final smoothness, you can apply the stain to the boards that will become the dark squares. You can use any stain that you want, as long as it will create some contrast between the unstained boards. It doesn’t really matter whether you use a water-based or oil-based stain, as long as it will work with the finish coat. For example, if you use a water-based stain, don’t try to apply an oil-based finish over it later.
When staining soft woods like pine, it helps to use a pre-stain product, also known as a wood conditioner. This will help the stain to absorb evenly. Without the pre-stain, the stain will usually end up looking blotchy, with some parts darker or lighter than others. With the pre-stain, you should get a nice and consistent color.
Temperature also affects how well the stain will be absorbed into the wood. Most stains will say on the label that they shouldn’t be applied if the temperature is below a certain point. If you try to apply the stain in a room that’s too cold, or even if only the boards are cold, then it might not soak in very well and the wood will end up much lighter than it should. If it’s cold in your garage or workshop and you want to stain, consider getting some kind of heater to keep the space and the materials warm.
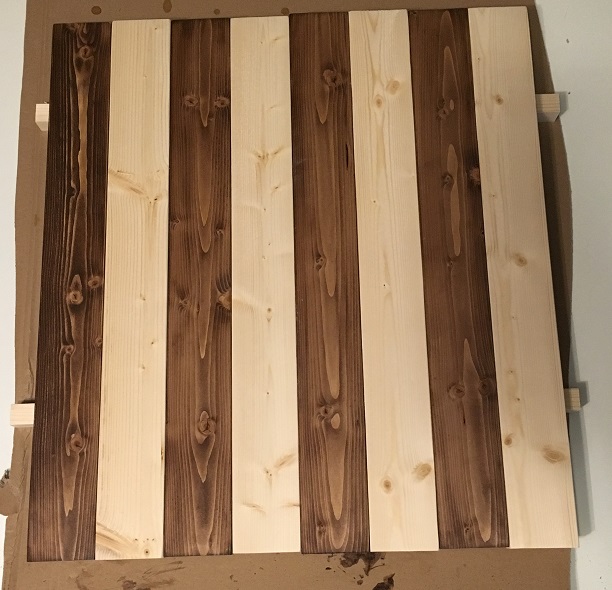
First Glue Up
Once you’ve stained the dark boards, you’re ready for the first glue up. This is a fairly simple process. Just apply glue to at least one side of each joint and then clamp the boards together. Make sure to spread the glue thoroughly so that it covers the entire area of the joints. You should use enough glue so that there’s an even amount of squeeze-out along the joint when you clamp it, but not so much that you get an excessive amount of squeeze-out, because that’s just a waste of glue.
Speaking of squeeze-out, it’s important to completely clean up the excess glue on the top of the board. Normally you’d be able to sand away any dried excess glue afterwards, but in this case we can’t sand the surface anymore because that would remove the stain. So after you clamp the boards, go across each joint with some kind of scraper and remove all of the squeeze-out. Then clean up any leftover glue with a wet rag or wet paper towels. Make sure that there’s absolutely no glue left over, because it will dry yellow and ruin the surface.
When you clamp the boards together, it helps to clamp some additional boards across the top and bottom to keep the whole thing flat. The pressure from the clamps tends to cause the boards to bow in one direction, so clamping some straight, flat boards onto them will keep them flat. It helps to cover these additional boards with plastic tape, like packing tape, so that they don’t get stuck to the actual work piece.
Once you have it all clamped up and cleaned off, let it sit for at least a few hours, but preferably over night. You want the glue to be completely cured before you continue.
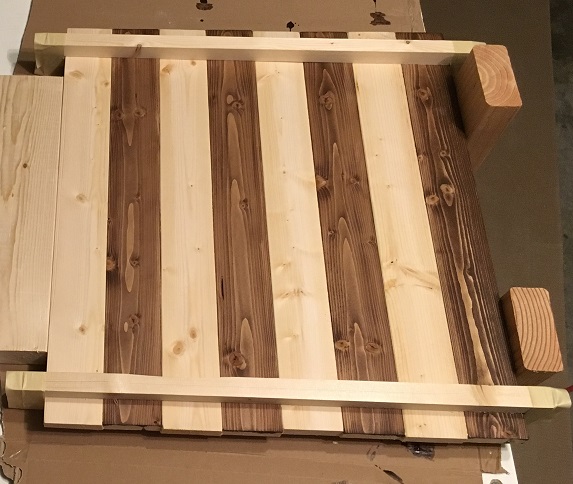
Cutting Again
Once you have the boards glued together with the alternating dark and light boards, you’re ready to cut strips out of that. This will give you eight strips with alternating light and dark squares. You might need to straighten one edge first before you run it through the table saw. This can be done with a cross-cut sled on the table saw, or by simply drawing a straight line on one edge and cutting to it with any other saw. It’s also important that that side is perfectly square, otherwise the squares will end up crooked.
Once you have one perfectly straight side, just set your table saw fence to the width that you want your chess squares to be, and place that side against the fence. If you measured properly in the beginning and gave yourself enough extra wood to work with, then you should have enough for 8 strips with just a little excess.
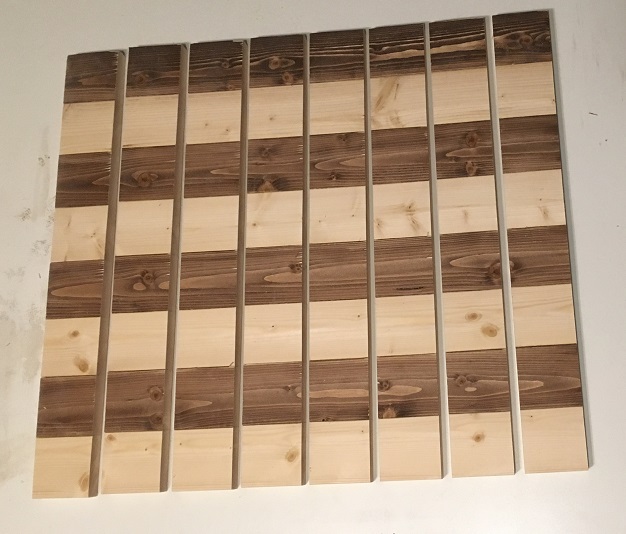
I sanded the sides of each strip again to round them over, even though it removed the stain on those edges. It’s not ideal, but I needed each side of every square to be rounded over, otherwise it wouldn’t look consistent. The loss of stained area is minimal, so it doesn’t affect the appearance too much.
Now that you have all of the strips cut out and the squares formed, you can flip every other board to create the checkered pattern. Keep in mind that a chess board is oriented so that there is a dark square on the far left and a light square on the far right. Now’s the time to decide which way you want the grain to run from the point of view of the players. It can either run side to side or front to back. It’s really just up to your personal preference.
Second Glue Up
Unlike the first glue up, all of the joints in this glue up will be end grain to end grain. These are much weaker joints than long grain joints. They also tend to soak up the glue much more, so it helps to over-apply it. You can do this by applying a layer of glue to each side of the joint once, then letting it soak in for a couple of minutes. Then apply another layer of glue, then clamp it together.
It’s much more important this time that you don’t let the boards slip too much out of place. Apply a bit of clamping pressure and then readjust the boards if you need to, making sure that the squares are still aligned with each other. It’s important to once again add some kind of pressure from the top and bottom to keep the board flat, especially because this is the final glue up.
Make sure to clean up all of the excess glue on the surface, and then let the glue cure at least overnight. Remember that end grain joints are not very strong, so give the glue as much time as possible to cure properly.
Finishing
After the glue is cured, you can unclamp the board and move on to the finishing stage. To finish my board I simply sanded the edges to make sure that they’re flat and smooth, then rounded over the sharp edges and corners. Then I applied three coats of satin polyurethane to the top. Because of the slight unevenness of the squares, I had to be careful to get the polyurethane into all of the edges of each square.
I decided not to add any kind of border or trim to the board, but you could add one to yours if you wanted to. Keep in mind that solid wood chess boards like these will expand and contract with changes in humidity, so any border or trim needs to be able to withstand that.
Once the varnish cures, the board is pretty much complete. You can add some rubber or felt pads underneath the corners, but other than that, the pine chess board is done.