If you’ve ever had to do any work without a desk or table of some kind then you know how difficult it can be. Trying to use a laptop or write in a notebook on your lap is challenging and causes you to hunch after a while. Even worse is if you need to tinker with something without a solid flat surface to work on. A good desk or table helps tremendously to make your work space more comfortable and efficient for all your work needs.
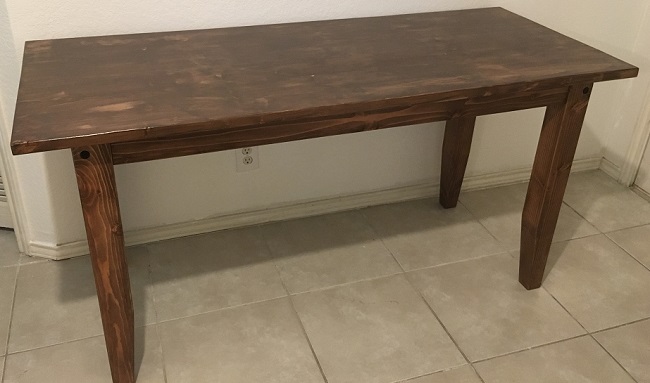
Any table is better than no table, but a solid wooden desk is a good option because it’s strong and heavy. This means that it will be able to support a lot of weight if you need it to, and also be sturdy enough to resist wobbling. A heavy, stable desk is important for things like 3D printers because it mitigates vibrations from the printer. Wooden desks are also more aesthetically pleasing, in my opinion, than plastic or metal tables.
There’s one major drawback to solid wood desks though, and that’s how much they cost to buy. A basic desk made of solid wood usually starts at around $300 USD, and they only go up from there. A much cheaper option is to build one yourself using materials that you can get at your local home center or hardware store. If you already have some basic power tools like a table saw, drill, and miter saw, then it’s a fairly simple task to build a desk like the one I made. The cost of all of the lumber for this project should cost less than $100, depending on the price of lumber in your area.
You don’t need to worry if you’ve never built any type of furniture before, because neither had I before I started this project. This is very much a beginner’s guide to building a simple wooden desk, written from a beginner’s perspective. I definitely made a few mistakes on my build, so hopefully I can help you to avoid those. Don’t worry if you make a few mistakes though, because those will add character and give your desk a handmade appearance.
Materials
- Three 2x6s at 10 feet long
- Two 2x4s at 6 feet long
- Two 4×4 at 6 feet long
- Wood glue
- Wood filler (optional)
- Your choice of fasteners
- Six 90 degree brackets (optional)
To keep the cost of this build low I chose to use softwood dimensional lumber from the home center. Specifically I used kiln dried douglas fir for the top, and normal pine 2x4s and 4x4s for the base. These boards are cheap and easy to buy at any home center. If you want to step up the quality of your desk you could build it out of hardwood instead, but that would increase the cost quite a bit. Hardwoods are also harder on your tools.
To assemble the table you can use any kind of fasteners that you like. Because I wanted the legs of my desk to be detachable, I used furniture bolts and barrel nuts, but you could just use normal wood screws if you don’t need that option. Having the legs be removable just makes it easier to transport in case I need to move.
Tools
- Table saw
- Miter saw
- Circular saw
- Hand plane
- Drill
- Router
- Random orbital sander
- Sandpaper (40 – 220 grit)
- Screwdriver
- Straight edge
The tools that I used for this build are all tools that I already had, so it didn’t cost me anything. If you need to buy any tools to build your desk then it will increase the cost of your build, but keep in mind that you can use any tools that you buy on other projects as well.
You can also substitute certain tools for others. For instance I didn’t need to use the table saw, it just made it a bit easier. If you don’t have a table saw then you could get away with just using a circular saw along with a straight edge, like an improvised track saw. Also, the router isn’t totally necessary. I used it to get a straight edge on one side of my boards, but there are other ways to do that.
Step 1: Cut Everything to Length
I designed my desk to be 5 feet wide and about 2 feet deep. The nice thing about making your own desk is that you can decide the exact dimensions for yourself. If you want a bigger or smaller desk you can make it that way. A 2 foot depth is pretty normal, and it allows you to easily reach the back of the desk while sitting in front of it, but you could also adjust that if you wanted to.
To build the table top I cut out five 2x6s at 5 feet each. If you use 10 foot long 2x6s then you can get two 5 foot pieces by cutting them in half. A 2×6 starts out at about 5 and a half inches wide, and they’ll each get about a quarter inch trimmed off of each side during the jointing process, so they’ll end up at about 5 inches wide. When all five boards are joined together this gives us a total of 25 inches, so just over 2 feet of depth.
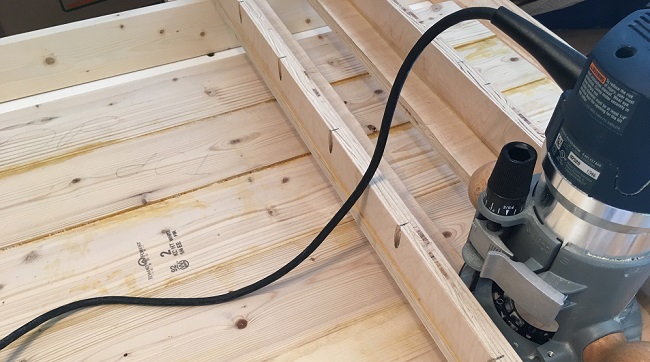
I cut the 2x4s to make the frame that will support the table top and connect to the legs. The two long pieces for the front and back I cut at 46 inches, and the two side pieces I cut at 16 inches. There’s also a middle brace that will help keep the desk from sagging in the middle over time. Instead of measuring for that piece I dry fit the frame together and then traced the length onto that 2×4. This is a good way of getting a snug fit instead of trying to measure exactly. If you make a shorter desk then you might not need that piece.
The legs are each 30 inches long, which puts the height of the desk at just over 31 inches. This is a pretty standard height for a desk, but you can make yours shorter or taller to best fit you and the chair that you plan to use. I decided to taper the ends of the legs from 3 inches down to 2 inches at the bottom. I tapered the 2 inside faces of each leg with a tapering jig, but you could also cut them by hand. This was purely for decoration so it’s not necessary at all if you want to leave it out.
Remember that if you adjust the dimensions of your tabletop you’ll probably have to adjust the measurements for the frame so that you get the right amount of overhang on the edges that you want.
Step 2: Joint the Top Boards
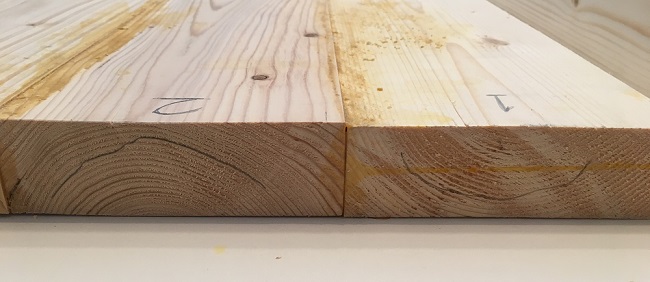
Jointing is the process of making the edges of the boards straight so that they can be glued together lengthwise and not have any gaps. There is a tool called a jointer that is pretty much the best tool for this job, but jointers are usually very large and expensive so most people don’t have them. I don’t have one, so I used a router in a router table to joint my boards. There are other methods that you can use, including using a table saw. I won’t get into too much detail on how to do it in this article, but you can check out this video on the topic if you want to learn more.
Once you have the boards jointed, lay them next to each other in the order that you want them to be in. Make sure that you alternate the direction of the growth rings, as shown in the picture above. This will help to minimize warping. If all of the growth rings curved in the same direction then the desk would tend to warp drastically in one direction. Alternating them helps to even it out.
Once you have the boards in the order that you want them, make sure that you’re happy with the grain patterns on what will be the top of the desk. If there are any checks or splinters in your boards, those should probably face down so that you get a smooth top surface. Also check for any tear out in the boards. Sometimes the boards will have deep chunks missing where the saw tore out the grain. It can take a lot of sanding to get those surfaces to be even again, so it’s usually better not to have those on the top. After that just mark the boards so that you can put them back together in the same order for the glue up.
If you want to, you can use something to help you align the boards. This could be dowels, biscuits, or even pocket hole screws. Anything that will help to keep the boards from slipping out of alignment while you glue them together. I didn’t have a dowel jig or a biscuit jointer, but I did have a pocket hole jig, so that’s what I used. In hindsight it probably wasn’t the best idea, because the pocket screws go in at an angle. This means that if you sand too deep or cut too deep when you flatten you could hit a screw. If you use pocket screws, I would recommend that you take the screws out after you glue it together.
Step 3: Glue the Top

Once all of your boards fit together you’re ready to glue the top. You can use any kind of wood glue that you want, but the better the glue, the stronger and more durable the bond. Better glues like Titebond 2 or even Titebond 3 are water proof, so they won’t be ruined if your desk ever gets exposed to water. If you use water based stain and varnish products then it’s probably a good idea to use a more premium glue.
Before you glue it’s a good idea to lay down a sheet of some kind to protect your workbench or whatever surface you’ll be gluing on top of. I used a plastic sheet, but you could use anything you have. If you use something that will stick to the glue, like a sheet of paper or a canvas drop cloth, then make sure that you don’t let the tabletop sit directly on the sheet while it dries, because it will just stick to the sheet. You can use some scraps of wood or clamps to keep it elevated.
There are different opinions on how to apply glue. Some people say that you should apply the glue to only one side of the joint, others say apply it to both sides. Then there’s all the different methods of spreading the glue. In my opinion it doesn’t really matter how you spread the glue, as long as you cover the entire surface of the glue joint. You can use a glue stick, a roller, or even just your finger, as long as there are no areas that are without glue. I put glue on both sides of my joints just in case, but you don’t have to.
After you glue your tabletop, you’ll need to apply some clamping pressure on the sides. If you have clamps that are long enough then you can simply clamp them across the top and bottom of the tabletop so that it applies even pressure. If you’re like me and don’t have clamps long enough to span across the table, then you’ll have to come up with a different method.
What I did was clamp some boards to the edge of my workbench, so that they formed a fence. Then I used the bench vise on the opposite side of the workbench with a board sticking out of it to apply pressure on the tabletop. This squeezed the whole tabletop up against the fence, effectively clamping it together while the glue dried. I also had the help of the pocket screws which held the boards pretty tight together already. You could even use ratchet straps if you had to. The point is, don’t worry if you don’t have clamps because there’s usually a way to do it without them.
When you clamp the boards together you should get a decent amount of glue squeeze out all along the seams. Make sure to wipe that off as best you can with a wet rag or paper towel, because it’s much easier to clean up before it dries.
Step 4: Flattening
After you let your tabletop dry for 24 hours, check it to see how flat it is. Just lay it on a flat surface and see if it wobbles. If you’re lucky and were able to find boards that were good and flat, then your tabletop will probably already be flat. If it’s wobbly, then you have a decision to make. You can either try to flatten it out, or leave it and hope that when you screw it to the base frame it will flatten out. If it’s only slightly crooked then you might be able to get away with just leaving it, but if it wobbles a lot then that means there’s significant twist in your tabletop.
One of the best ways to eliminate twist is to use a router flattening jig. This is basically a frame that goes around your work piece, and a sled that slides along that frame with a channel for a router to slide back and forth. If you’re interested in making one, here’s a tutorial. You just have to make sure that the rails are straight and flat, as well as level on the same plane. You can check this by laying a level across the rails and checking that they’re level on both ends and in the middle.
Once you have it all level, use some shims to make sure that your table doesn’t wobble. Then simply set the router to the height of the lowest spot on your table. Then you make a bunch of passes across your tabletop, taking off a little bit of material with each pass. You repeat down the length of your table and when you’re done, that side will be completely flat. Then you just flip it over and flatten the other side.
I tried this method for the first time when I built my table, and I made a pretty big mistake about halfway through. I had to switch routers halfway through because the first router I tried, which was newer, kept failing for some reason. It would shut off after just a few minutes of routing. When I switched the bit to an older router I was in a bit of a rush and forgot to lock the depth, and as I was routing it started cutting deeper. This meant that I had to rout the whole side to that depth, removing much more material than I had planned. The lesson here is that you should always make sure that your depth is set and locked before you start.
If you don’t have a router with a flattening bit, you could also flatten your tabletop by sanding. Just determine where your high spots are that are causing it to wobble and sand them down. It might take a while and you’ll need to check fairly often to make sure that you aren’t sanding too much, but it should give you a fairly flat tabletop.
Step 5: Sanding
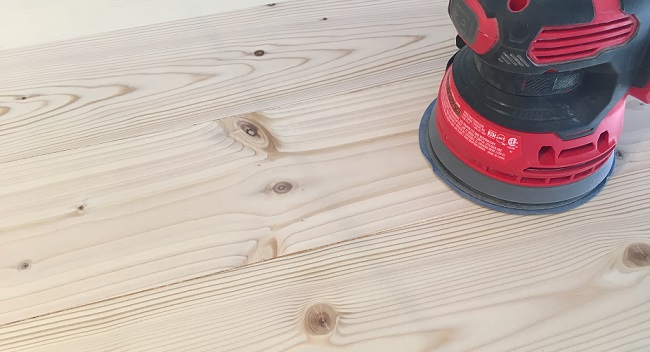
You might think that sanding will be a long and tedious process, but it’s actually fairly quick if you use a random orbital sander. As long as you start with the right grit of sandpaper, it shouldn’t take very long to get everything smooth. What I mean by that is that you shouldn’t start with too high of a grit, because that will make it harder to smooth out any unevenness. A coarser grit like 60 or even 40 will make short work of any large bumps or deep gouges.
The other important thing to remember about sanding is that you shouldn’t try to jump through the grits too quickly. In other words, don’t jump from a 60 grit straight to a 150 grit sandpaper. Always increase in steady increments, like 60 to 80, then to 120, then 150, 180, and finally 220. Those are the standard grits of sandpaper that you can find in stores, and you really don’t need to go any higher than 220 grit.
Some people say that you don’t even need to go all the way to 220. They say that once you hit 180, any finer than that doesn’t make a difference. I’m not sure about this because I used a satin finish on my table which is very forgiving and doesn’t need a super smooth surface. If you use a gloss finish then going to 220 might make a difference for you. For satin finishes you could probably get away with going up to 180 grit if you want to save some time or money.
Step 6: Pre-Stain and Staining
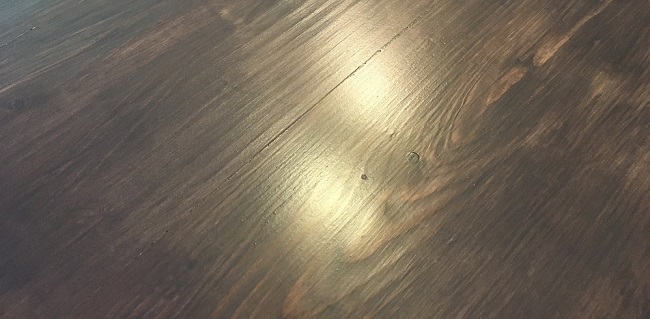
Staining is the process of changing the color of wood. It’s more like tinting the wood instead of painting, because the stain soaks into the wood but still lets the grain pattern show through. There are many different colors of stain that you can choose from, ranging from light to dark. There are even some colored stains like white, blue, red, and green. It’s really up to you what sort of look you’re going for. I originally wanted a light golden stain, but all they had at my local store were darker colors, so I went with a dark brown.
One misconception that people have is that stains seal the wood. While oil based stains might offer a slight benefit just because of their oil content, they don’t do much to actually seal the wood and protect the surface. All a stain does is soak in and change the color of the wood. If you want to protect and seal the surface then you need to apply some kind of varnish after you stain it. That will be the next step.
There are two main types of stains, and those are water based or oil based. Oil based stains are the traditional type of stain that have been around for many years. People like them because they give a rich color with a lot of depth, but there are some disadvantages as well. The main problem is that they take a long time to dry. Most oil based stains take at least a full day to dry, and some even longer than that. If you’re on a limited time frame then you might want to avoid oil based stains.
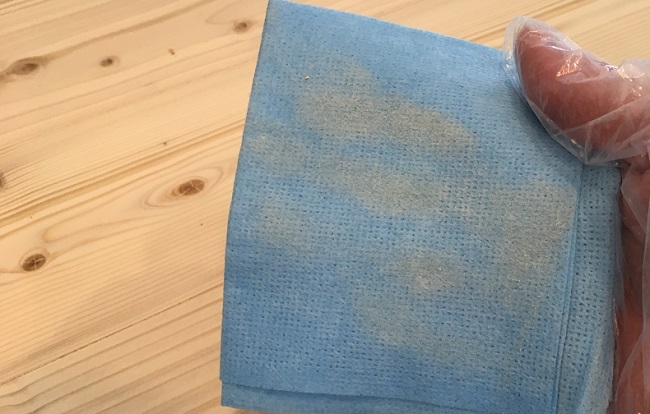
Water based stains on the other hand dry much quicker. Mine recommended just 3 hours after applying the stain before it’s ready for varnish. They’re also easier to clean up than oil based stains, all you need is a wet rag. If it gets on your hands just wash it off with soap and water. Oil based stains usually require mineral spirits to clean up.
The fast drying time of water based stains can also be a disadvantage in some cases. Because they dry so fast, if you’re staining a large area like a tabletop, it’s possible for one area to dry before you finish staining the whole surface. This is problematic because you’re supposed to wipe off the excess stain before it dries, otherwise it can leave an uneven appearance.
Because it’s water based, it also tends to raise the grain of the wood. This means that even after you sand the surface smooth, the water in the stain will cause the fibers of the wood to stand up. This creates a slightly rough texture. To combat this, you just need to lightly sand the surface once it’s dry with a 220 grit sandpaper. Don’t sand too much though or you’ll sand away some of the color. After that just clean up the dust and you’re ready to continue.
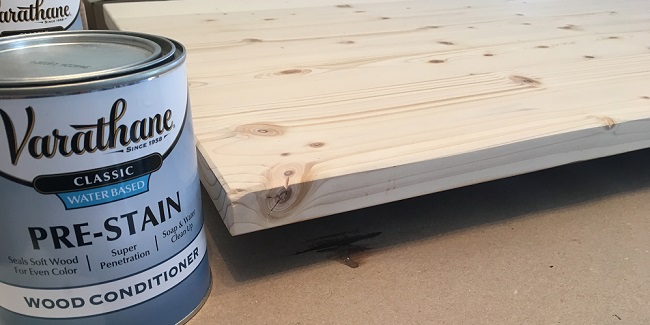
If you used softwoods for your table like me, then pre-staining the wood before you stain is a good idea. Pre-stain helps to make the wood absorb the stain more evenly. Without the pre-stain, softwoods tend to look very blotchy and uneven when you stain them. I made the mistake of not applying enough pre-stain on my tabletop and it turned out quite blotchy. What I should have done was apply enough pre-stain so that it wouldn’t soak in after just a few minutes. There should be enough to keep the surface wet. Then after a few minutes you wipe off the excess.
If you’re not sure how much to apply, I would suggest that you start with the legs or the frame, on an area that won’t show on the finished table. The inside of the frame pieces are good places to experiment. Just remember to apply it very liberally and don’t let it dry before you wipe off the excess.
After you apply the pre-stain and wiped off the excess, let it dry for the amount of time recommended on the can, in my case it was about 20 minutes. Then apply your stain. You can use a rag, a foam brush, and old t-shirt, or anything that’s lint free and will allow you to apply it evenly. Once again you should apply a liberal amount so that there is a wet layer that sits across the surface of the wood. If it starts to soak in and dry then you should apply more. If you use water based stain, wipe off the excess after 3 or 4 minutes. For oil based stains you can wait longer.
If there are any areas that look uneven or streaky, you can try to rub some stain on it to try and even it out. Sometimes this will work and sometimes it won’t. If you applied the pre-stain properly and put enough stain then you should be left with a nice even color. Let it dry for the amount of time recommended on the label and then you can apply the varnish.
Step 7: Varnish
I chose to apply the varnish on my desk before assembly, because I wanted to be able to lay the pieces flat so that the finish wouldn’t run down any vertical surfaces. You could apply it after you assemble your desk if you want, it’s just a matter of preference. The type of varnish that you choose to use will also factor in to how you apply it. If you use a spray on varnish like a lacquer, then it might be easier to spray it on after you assemble the whole table. For me, since I used a water based polyurethane, I set the pieces on my workbench and brushed it on with a foam brush.
Lacquer and polyurethane seem to be the most popular types of finish for things like desks, but there are a few other options. You might want to look into oil finishes like tung oil, or there’s also shellac.
For polyurethane finishes, you once again have the choice between oil based and water based. Just like the stains, oil based polyurethanes take much longer to dry than water based. This is especially important when it comes to the finish, because it’s recommended to apply at least 3 coats. If you have to wait a full day between coats, then it can take quite a few more days to apply an oil based finish than a water based. Water based polyurethane only takes 2 hours to dry between coats. You could apply all 3 coats in the same day.
Once you decide on the type of varnish you want to use, you should consider what kind of appearance you want it to have. The three main finishes are satin, semigloss, and gloss. Generally speaking, glossy finishes are more difficult to get right because they’ll show any imperfections like bubbles or dust more than a satin finish. They also need to be applied more carefully so that they have the most even surface as possible.
Satin finishes are usually much easier to apply because they’re more forgiving in terms of hiding imperfections. You don’t need to be as careful when applying a satin finish because they won’t show every little brush mark or dust inclusion.
That being said, you should still make sure that your table surfaces are prepped and ready for the finish. Make sure that you vacuum all of the dust of before you apply it, and then go over everything again with a clean cloth or a tack cloth to wipe off any remaining dust. Vacuuming alone won’t remove all of the dust, which you will find out as soon as you wipe it afterwards.
To apply my finish I used a cheap foam brush. These are good for applying polyurethane because they don’t leave brush marks. Because I used a water based polyurethane I could rinse out the brush with water and reuse it. You could also use a high quality bristle brush, but I would avoid cheap bristle brushes, even if you’re using a satin finish. The bristles on the cheap brushes tend to fall out, and if you don’t notice them and take them out then you’ll be left with bristles in your finish.
It’s a good idea to pour your varnish into a separate cup or container so that you’re not dipping your brush into the original can. This is because there can sometimes be some residual stain on your work piece that will transfer onto the brush. If you dip that same brush into the can, it will contaminate the entire can. So it’s better to only contaminate the small amount in your cup than the whole can. Also, it’s good to start with a small amount, because you can always pour yourself more, but you shouldn’t pour the excess back into the can, again because of contamination.
Just brush the varnish on with long, even strokes and try to overlap each pass slightly. Also it helps to have good lighting so that you can check to make sure that you didn’t miss any spots. It’s a good idea to keep your garage door or windows open so that you get good ventilation, especially for oil based finishes.
A minimum of three coats is usually recommended, but you could add more if you think that you’ll be putting a lot of wear and tear on your surface. For the underside of my table I only put 2 coats, and same for any areas of the frame that were not going to be showing. For the legs I decided to put a full 3 coats, because they could potentially see some wear with things bumping into them.
After you’ve finished the varnish, all that’s left is assembly.
Step 8: Assembly
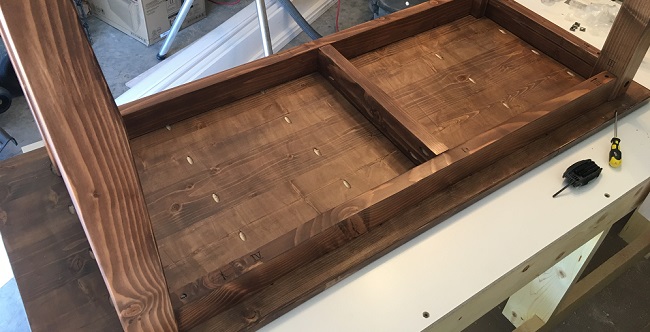
Like I said, I decided to assemble my table after I applied the varnish. To keep everything as simple and easy as possible I decided to use fasteners to secure the frame and legs to the tabletop. I used slotted barrel nuts and bolts to hold the legs to the frame, and metal brackets and screws to hold the frame to the desk top. Using fasteners makes it so that I can easily take the legs off if I ever need to transport the desk, like if I need to pack it up for moving.
For the metal brackets that hold the desk top to the frame, I made sure to cut slots in some of them to allow the top to expand and contract. Because the top is made of solid wood, it’s susceptible to changes in humidity and will expand and contract naturally. If you don’t have slots for the screws to move sideways, then the force of that movement can split the boards. The middle of the table can be secured without those slots, because that part will remain stationary. Only the brackets on the sides of the frame need to be slotted.
Each leg has three barrel nuts and bolts holding it in place. Two on one side and one on the other. I only had short barrel nuts, so for the side that holds two barrel nuts I had to drill two holes, one on the top and one on the bottom of the frame. This makes it impossible to access the top barrel nut once the top is attached. A better way to do it would have been to use a longer barrel nut with two threaded openings, instead of the small single hole ones that I used. Then the nut could be removed only from the bottom.
If all you have is wood screws then you could just use those. It would be much simpler, but there might be some longevity issues. If your table gets bumped a lot then the screws might start to get loose. Because they’re holding into the wood itself, if the screw hole gets worn out then the legs might get wobbly. In my opinion nuts and bolts will hold up better in the long run, but wood screws can work if you have nothing else.
If you have to counter sink any of your screw holes to hide the screw heads, or just to make it so that your screws reach far enough, then make sure to stain the insides of the holes. Otherwise the bare wood color will be visible and it won’t match the rest of the table.
After you’ve screwed everything together, your table is complete. It’s usually good to let the finish cure for a few days before you subject it to full use, but other than that, it’s done. If you managed to complete your desk without any major disasters, congratulations. You should have a desk that will last you for many years and one that shows the marks of your own handiwork.