
Making Leather Pouches For Costumes (With Free Pattern)
Leather pouches are essential props for many costumes. They give a character a more adventurous appearance, because we expect adventurers to usually carry a lot of gear and items. They also add an element of mystery, because people might wonder what’s inside them.
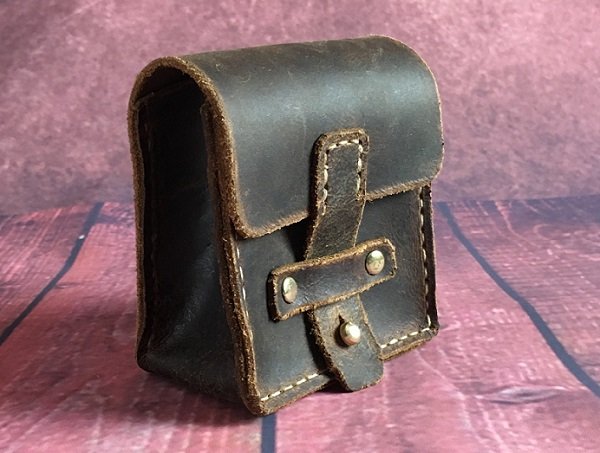
In this article I’ll go over how to make a leather pouch that’s a bit more complex than a simple drawstring pouch. While it requires a bit more time to make, it also has a more refined look that adds a lot of detail to a costume. It’s about 3 by 4 inches, so it’s quite small, and perfect for wearing on a belt.
I’ll include a PDF document here with the pattern for the small leather pouch to get you started. I’ll also go over in this article how to avoid some mistakes that I made in the beginning, in case you want to design your own pouch or modify this one.
To get started, let’s go over the materials that you’ll need.
Materials
- Leather
- Leather is usually categorized by its weight instead of its thickness. I like to use a medium weight leather for pouches, around 4 to 6 ounces, because it gives them a nice rigidity. You can use thinner leather if you want to, but just realize that the pouches might not hold their shape as well if you do. If you want your pouches to be a bit floppier, then a thinner leather is ideal.
- Thread
- Waxed linen thread is strong, looks good, and has a natural look, so I prefer to use it. Nylon thread also works well.
- Leather Sewing Needles
- These are larger than normal sewing needles to accommodate the larger thread. They’re also duller so that they don’t stab through the leather.
- Knife
- For cutting out the leather pieces.
- Awl
- For poking the holes for the stitching.
- Hole punches
- For cutting out holes for rivets.
- Cutting Board
- Hardware
- This pouch is designed to use 2 small rivets, and one button stud.
Marking And Cutting Out The Pieces
Once you’ve printed out your patterns, cut them out so that you can trace around them onto the leather. Depending on what kind of leather you’re using, you can either scratch the outline in with something like an awl, or you can trace it with a pencil or chalk. I wouldn’t recommend that you use a marker or a pen, because those will likely leave excess ink on the leather that you’ll need to trim off later. Chalk or pencil marks can easily be brushed off.
Before you cut the pieces out, make sure that your knife is sharp and that you have your cutting board underneath where you’re cutting. A sharp knife is usually safer than a dull knife, because you won’t need to put as much force into the cuts. When cutting the leather, be very careful to keep your hands and fingers out of the way of the blade. Just remember, don’t cut towards yourself.
Marking And Punching The Holes
Once you have your pieces cut out, you can start to make the holes for the thread. In the pattern I have the stitching holes spaced an eighth of an inch from the edges of the leather. You can use the pattern to mark the holes by aligning the pattern directly over the leather and taping it in place. Then you can just use your awl to pierce through each hole in the pattern and through the leather. This will ensure that you make the proper number of holes on each piece. The only problem with this method is that if the paper gets misaligned, then your holes will also be out of place.
Another way you could do it is to trace a line around the edges of your leather pieces an eighth of an inch in, and then mark the holes along that line. This should ensure that your holes will all be perfectly in line. You just have to make sure that you still make the same number of holes as the pattern.
There is a special tool made for gouging out a line a set distance from the edge, called an edge groover. These are usually adjustable so that you can change the distance between the edge of the leather and the groove. Having your stitches lie within a groove makes it less likely that the thread will wear out over time, because it will be recessed into the leather a little bit. It’s not completely necessary, but it adds a nice touch.
The larger dots on the pattern are for the holes to be punched for the rivets and hardware. The size of the holes will depend on the size of your hardware, but for most of the smaller rivets, a 2 millimeter hole punch should work well. For the hole on the strap that fits over the button stud, that also depends on the size of the button stud that you use. The one that I used is about 4 millimeters at the base, so the hole only needs to be 4mm. The slit above the the hole on the strap is to allow it to fit over the head of the button.
Sewing

After you’ve made your holes, you’re ready to sew. The kind of stitch that we’ll be using for these pouches is called the saddle stitch. It’s a very strong and durable stitch that has been used for leather goods for a very long time. It uses two threads, so even if one thread snaps, the stitch will still hold together. There are many good tutorials online for how to sew a saddle stitch, so I’ll just link to one of them here.

One thing you should consider is how you want your seams to look. Depending on how you join the leather pieces together, the seam can look completely different. In the picture above I show you the three different ways you can orient the pieces to achieve different types of seams. If you want the stitching to be visible, go with either the first or the second option.

Hardware
I designed this pouch to have a few pieces of metal hardware. Just some rivets and button studs. If you don’t want to use any rivets, you can use some stitching instead. You can also replace the button stud with a snap button or a buckle if you prefer.

Keep in mind that there are different colors of hardware available. I like to use brass hardware, but there are a lot of other options, including silver and black. There are also antique finished hardware, which have kind of a patina on them.
Some colors of hardware look better on different colors of leather. Maybe experiment with different combinations, or look up pictures for inspiration. I like the classic look of brown leather with brass hardware, but black leather with silver hardware also looks pretty good.
Weathering
If you want your pouch to look like it’s seen some use, and not just appear to be brand new, then there are a few ways you can weather it. One easy method, which makes a pretty big difference in my opinion, is to simply rough up the edges of the leather. You can do this with either a specialized edge beveling tool, or with sandpaper, or with any sharp or rough object. Anything that will get rid of the clean cut edge of the leather pieces.
You might also consider taking some sandpaper and roughing up any areas of the pouch that you think would sustain a lot of wear and tear over time. Places like the corners of the pouch, or around the button closure.
Another good way of weathering leather is to crumple it. This can be a bit difficult with thicker leathers, but it can still be done. Just fold the leather repeatedly, and maybe apply some pressure, and it should start to develop some creases and wrinkles.
You could also apply a bit of paint to simulate dirt and grime build up. Some dark paint on the stitching can make it look like it’s seen a lot of use.
Designing Your Own
If you want to modify this design, feel free to do so. There are some things you should be careful of though. The easiest mistake to make, in my experience, is not having the same number of holes on both pieces of leather that you want to join. It’s not like sewing with a sewing machine, where the machine punches through both pieces of leather at once. You have to carefully count the holes on both pieces and make sure that they match. If one piece has 35 holes, the other piece also needs to have 35, or the pieces won’t match up.

The picture above shows my first attempt at making a leather pouch, and as you can see, the ends didn’t match up because I didn’t count the sewing holes. As long as you’re careful to avoid mistakes like this, your leather pouch projects should turn out just fine.