In fantasy worlds, whether it be movies, books, or games, shoulder armor is often featured very heavily. Sometimes it’s the only armor that a character wears. Leather shoulder armor specifically is often the favorite of rogue or ranger type characters.
Historically, medieval shoulder armor consisted of overlapping plates called lames, that fit the curvature of the shoulder and offered it good protection and mobility. The earlier version of these were called spaulders, and they covered only the shoulder. Later on they extended further to protect more of the armpit, and these were called pauldrons.
To make spaulders or pauldrons out of leather can be tricky, because it’s hard to get a piece of leather to curve enough to fit over the shoulder. Vegetable-tanned leather could probably be molded to fit pretty closely, but that kind of leather is expensive. If you’re on a budget and just want to make some leather armor for a cosplay or role playing game, then you’ll probably want to stick to modern chrome-tanned leather. However, be aware that if you want to harden the leather, then vegetable-tanned is your only option.
As a disclaimer, this article is mainly about making costume armor that is not meant to protect you from any damage or harm. I don’t recommend that you use unhardened leather armor for any combat or defense purposes, as it is just for show.
In this article I’ll go over what I think are good ways to make leather shoulder armor with affordable leather that will fit nicely over your arm. If you’re not much of a fan of the leather costume armors that you can buy online that are made mostly of flat pieces of leather and have huge gaps between the lames, then hopefully you’ll find some useful tips here to help you make your own. I’m not an expert or professional at this, but I hope you still find it useful.
Choosing the Seam
In order to get the leather to fit snugly over the shoulder, it’s best to join two or more pieces together with a seam. This will help to put a compound curve into the part that fits over the shoulder. There are many possible ways that you can join the leather together to get it to fit, but I chose to simply join two pieces together with one seam going from front to back. I thought that looked better than having the seam run down the shoulder.
To give the shoulder part a compound curve, the edges that join at the seam are curved. If they were just straight edges then the piece would still be flat when they were joined. By sewing the two curved sides together, it makes the piece curve into a dish shape that fits better over the shoulder.
You could make the curvature more drastic by simply increasing the curve of the seam, but I didn’t want it to look too square on the shoulder, so I left them a little less curved. Adding more seams and pieces of leather could also help give it a smoother transition and look more rounded instead of an abrupt edge.
Keep in mind though that the more seams you have and the more pieces of leather you use, the more “fantasy” your armor will look like. That might suit the style you’re looking for, but if not, you can try to use fewer pieces and keep it subtle. Historical armor was often simple and functional, with only as many different pieces as they needed.
Patterning
To get an idea of what the armor will look like, you can cut out pieces of paper or cardboard and tape or glue them together. I would do this before cutting out your leather so that you won’t waste any leather in case you don’t like how it turns out. If you use a thicker material like cardboard or card stock, it makes it easier to trace the pattern onto the leather. Paper tends to fold or crumple sometimes when you trace around the edges.
There are a million different ways you can pattern your armor. You can add spikes and points to the edges to make it look more fantasy-like, or you can keep the shapes simple and rounded. I went with a very simple design for my first shoulder armor, which has kind of a rectangular shape with rounded edges. This made it very easy to make the pattern and cut it out. In the future I’ll probably make some more elaborate designs.
Once you have your pieces the way you want, you can cut them out and join them. There are two main ways to join leather, and those are riveting or sewing. Technically you could glue it as well, but that doesn’t look very medieval, so I’ll leave that out.
Riveting
If you choose to use rivets, your project will go together much faster than if you sew it. However, I think it detracts from the look of the armor if it has too many rivets. That’s just my personal opinion though, so if you like the look of lots of rivets then you should definitely use them. They’re very easy to put in, and they give the armor sort of a “studded” look, if that’s what you want.
Of course some rivets are absolutely necessary for the pivot points on the armor, but I prefer to only use them for that purpose. We’ll get to that later when we add the lames.
Sewing

It’s a bit more difficult, or at least time consuming, to sew the leather together. If you use thin enough leather you can use a heavy duty sewing machine if you have one, but otherwise you’ll have to hand sew it. To hand sew the pieces together, you’ll first have to evenly mark the holes and then punch them out with a punch or an awl. Then you can sew it with whatever stitch you prefer.
I went with a saddle stitch, which uses two needles. It’s a very strong stitch because each thread interweaves through the leather, so even if one breaks, the other will still hold it together. You can carve out a groove for the thread to sit in, which will make it less likely for it to get worn out over time, or you can just have the stitch sit on top of the leather.
What kind of thread you use is up to you, but I would recommend something thicker, like around half a millimeter to a full millimeter in thickness. You can use synthetic nylon thread, or something like a natural linen thread. For my armor I used a beige colored waxed linen thread. I think it gives just the right amount of contrast while still having a natural and authentic look. Natural color thread is good, but black thread would probably also look fine.
Adding the Lames
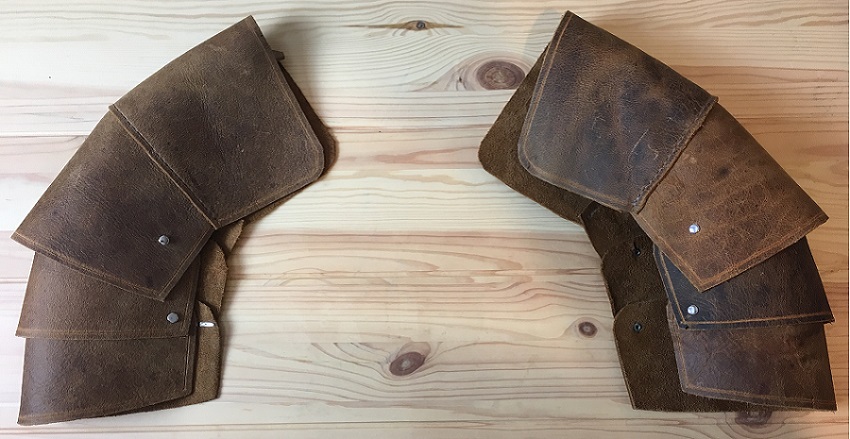
Once you’ve finished the part that fits over the shoulder, you can start adding the lames that transition into the upper arm. On original medieval armor there are usually around three or more lames that connect the spaulders to the rest of the arm harness. You can add as many or as few as you like really, since we’re making fantasy armor.
On my armor the lames are fairly large, about four inches long at the middle, so I chose to only use two. Even then it comes down almost to my elbow. In original medieval armor, the spaulders would only cover the shoulder, and the rest of the upper arm would be covered by what’s called a rerebrace. You can adhere to that style if you like, or makes the spaulders as large as you want.
Strapping it All Together
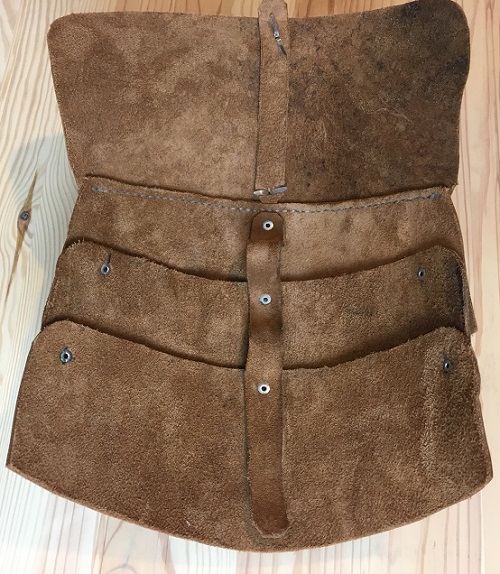
To get the lames to stay in place as well as articulate, they’re strapped together on the inside of the armor. You need at least one strap in the middle to make sure that the lames don’t pull too far apart, and adding a strap on each of the sides will allow for the lames to be able to move forward and backward as well.
On my armor I chose to just use one strap in the middle and have the sides of the lames riveted to each other. This gives the armor a bit less movement in all directions, but with how flexible my spaulders are already, I didn’t think it mattered much. If you want your armor to have the proper and authentic movement, I would suggest that you add those two extra straps on the sides.
To attach the straps to the lames, I think that the best thing to use is rivets. If you don’t like the look of rivets then you can try to hide them underneath where the lames overlap, which is what I did for some of them on my armor. But I did leave some exposed on the sides. Make sure that if you want something to be able to move and pivot, you don’t rivet it all the way. Close the rivet just enough so that it doesn’t come undone, but that the leather isn’t completely pinched closed.
Attaching the Armor to Yourself
The armor also needs to be able to attach to your body. Historically, spaulders were generally affixed to the shoulders by tying or strapping to an undergarment, but that’s not always an option for every costume. If you want to do that, you can sew some laces onto the shoulders of whatever garment you’re going to wear underneath the armor. That will allow you to tie the spaulders on and have them stay in the proper position.
You could also strap or tie them to another piece of armor, which is what I did. I made a piece of leather armor to go on my torso, and added a hole to attach the spaulders onto the shoulder straps of that armor. It holds fairly well, but I think that the historical method would probably have been better in terms of keeping it in the perfect position after a lot of movement.
I’ve also seen online where people make spaulders and have straps go across their body and under their arms to hold the in place. I think that this could work, and it definitely looks cool, but it seems like it might be more uncomfortable than the other methods. The straps could dig into your underarms, and there’s nothing to stop the spaulders from rotating out of place really. If you strap them too tight across your body it could also restrict your movement.
It also helps to have another strap at the bottom of the spaulders, usually on the last lame, to hold it to your upper arm. This will allow the spaulders to move with your arms as you move them around, instead of them just flopping around. You can have them with an adjustable strap if you think you’re going to be wearing different thicknesses of clothing underneath, or just make it a permanent fixed length strap that you slide your arm through.
Whichever method of attachment you use will depend on the style of spaulders you’re making and what you’ll be wearing them with. Whatever you do, it’s a good idea to test it out before you use it to make sure that it fits properly and doesn’t shift around while you wear it. Also if anything is uncomfortable or chafing, then you should probably change it.
Decoration
The good thing about leather, even chrome-tanned leather, is that it’s easy to decorate the surface. While you can’t tool and dye chrome-tanned leather to create elaborate relief patterns, you can still carve designs into it with a gouging tool or a knife. Also, there are so many colors of leather to choose from.
For my armor I chose to just do a simple line around the edges to kind of highlight the borders or the lames. I like the look of just the leather grain and didn’t think it needed much else, but I’ve seen some people carve very nice patterns into their armor. Things like feather designs, leaf shapes, and Celtic knot type decorations. You can really add anything you want, depending on the style of armor you’re making.
Of course you can also decorate the armor just by cutting the pieces of leather out in interesting ways. You can make the edges of the lames have spikes or other shapes, as some historical armor had. German gothic armor is characterized by heavily decorated edges with designs carved and punched into them. You could do something like that, or something more fantasy-like. A nature themed armor might for example have leaf shaped lames.