How to Design and Make the Perfect Hood for Your Cosplay
Hoods are an integral part of many costumes. They come in many different styles, and they can completely change the silhouette and aura of a character. Unfortunately hoods can be tricky to get right, and sometimes what we see in video games or animation doesn’t actually translate very well into reality.
Making a hood, or really any type of garment, involves taking flat pieces of fabric and turning them into three dimensional objects when they’re worn on a body. In video games or animation, the artist can draw the hood however they want, without needing to worry about how to make it in real life. This can lead to unrealistic designs, and sometimes if you try to copy a hood exactly from the source material, you’ll find that it’s just not possible.
For example, often times the source material will show a hood that has some visible seams, but it’s actually impossible to make the shape of the hood with those exact seams. Flat pieces of fabric can’t magically form into complex, compound curves on their own.
If you’re lucky, the hood you want to make was designed realistically, and you can make it look exactly like the source material. If not, then the solution is simply to add extra seams where you need them. You can still make the hood in the right shape, but it might not exactly match the source.
In this article I’ll go over different common types of hoods and how to draw up patterns for them so that you can sew them together. There are many different kinds of hoods out there, so I can’t do every single one, but hopefully you’ll at least find something close enough to what you’re trying to make.
A Bit About Fabric Drape
Different fabrics will hang off of the body differently. The ability of a fabric to flow, fold, and hang easily is called drape. A fabric that drapes well will hang off of the body and form many small folds and creases. It will also be more affected by gravity, so it will hang down straighter than a fabric with less drape.
When it comes to hoods, generally it’s good to have a fabric with moderate to high drape. That way it will hang off of your head nicely, even as you move your head. Plain woven fabrics like muslin or canvas tend to not drape very well, so if you use them for a hood it can end up looking rigid and stiff. Fabrics like twills or knits are very good for hoods in my opinion.
You don’t need to memorize which fabrics do or don’t drape well, because you can test the drape of any fabric at the store before you buy it. Just unroll a bit of the fabric from the roll and hold it up in the air, or drape it over yourself or something else. If it hugs the object it’s placed over and hangs straight down, then it has good drape. That way you can choose the fabric that has just the right amount of drape that you want.
A Basic Hood
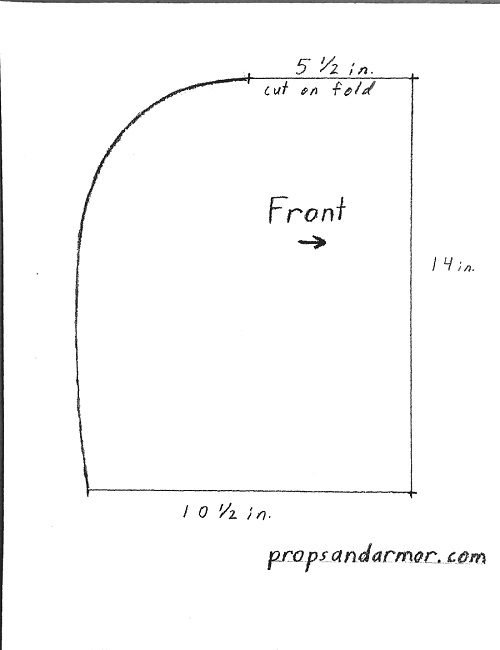
This is a super simple hood that has no darts, and only one seam. Imagine the type of hood on most hooded sweaters. You can cut the fabric for this hood with the top of the pattern on a fold, so that you only sew up the back of the hood. This will leave you with one seam at the back and no seam on top, which is sometimes what you want. You could also cut the fabric into two separate pieces, and sew them all the way up the back and top.
This pattern has no darts. For those of you who might not know, a dart is a tapered seam that’s added to garments to gather some of the material, which can adjust the shape and add a contour. Because this hood has no darts, it won’t completely form to the shape of the head. This can lead to some bunching and folding around the top back of the hood, but if you use the right material it won’t look so bad.
The ease of cutting and sewing this type of hood makes it a very good choice for a lot of costumes.
Contoured Hood
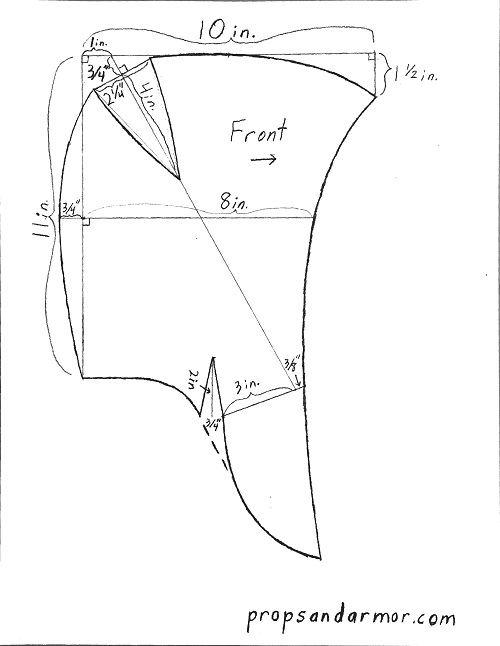
Sometimes you might want a hood that is very closely fitted to your head, with virtually no creases or fold. To do this all you have to do is add some darts to the pattern at the area where this happens the most, which is usually the top back of the hood.
The darts on this pattern will end up looking like a horizontal seam at the top back of the hood. If that’s something that you don’t really want, then this might not be the best type of hood for you. However, it is possible to add another layer of fabric over the top of it to hide that seam.
Because this hood is so close fitting to the head, it’s a good choice for people who want their hood to stay on. Even if you move around a lot or it’s a windy day, the hood should stay up just from friction.
Over Sized Hood
A lot of fantasy designs feature huge, over sized hoods that completely shroud the face and drape down to the shoulders. Some of them aren’t so extreme, but still pretty big. To make this kind of hood is actually pretty simple, but it might take some trial and error to get it just right for your costume.
All you have to do to make an over sized hood is take a normal hood pattern, and extend it wherever you need to. If you extend the front out, then the hood will cover the face more. If you extend the bottom of the pattern downwards, then more fabric will fall around the shoulders. You can also extend specific parts of the hood, like only the front tip, or only the lower back. You can really customize it however you want.
One problem with over sized hoods is that they sometimes have problems staying on the head. Because they’re so loose, and there’s so much extra fabric weighing them down, they tend to just slide off of the head. If you move around a lot, or if you’re outdoors and there’s a slight breeze, this kind of hood can be very troublesome to keep on your head.
There are a few solutions to this. If you’re wearing the hood over something else, like a helmet, then you might want to consider adding a bit of velcro to hold it in place. There are sticky velcro patches that you can attach non-permanently to the top of the helmet, but you might have to sew the other part onto the hood to get it to stick.
Another trick is to put some grippy rubber patches or strips on this inside of the hood. This will hopefully help it to grip onto your hair or helmet or whatever is underneath the hood. This technique might be a bit uncomfortable if it pulls your hair, but at least your hood will stay up.
One of the best ways in my opinion to keep a loose fitting hood on your head is to sew a close-fitting hat onto the inside of the hood. If you can find a light weight hat with an elastic headband, those work very well. A lot of times you can find them as exercise caps. You can sew one of those on the inside of the hood, and if the hood is big enough then it should be completely concealed.
Three Section Hood
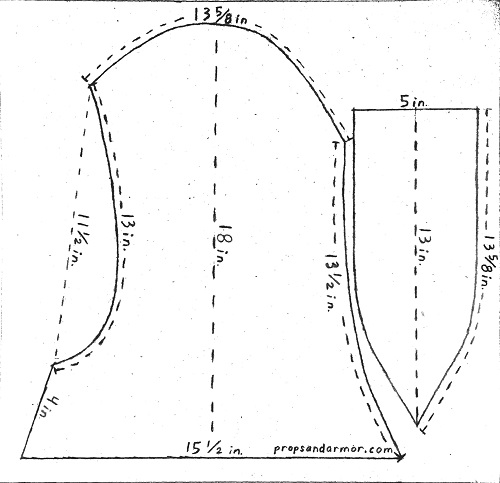
I’m sure you’ve seen hoods like these in video games, and sometimes in real life too. It’s built in three sections, with one in the middle and two on the sides. It’s a pretty good design because it kind of contours the hood the fit the head without the need for any darts. Sometimes the middle section runs through the entire length of the hood, but other times it’s only on the top or the bottom.
For the pattern I made, the middle section ends at around the middle back of the hood, and then the two side sections join together.
Peaked Hood
A lot of hoods are designed with a peak or point at the front that extends in front of the face. This is pretty simple to accomplish actually. If you’re making a two piece hood like the first three hoods in this article, all you have to do is curve the front of the pattern outward, like in the picture. Because the fabric will be cut on a fold, or you’re going to sew the two parts together at that point, it will form a point once the hood is complete.
A point at the front of the hood can be a bit hard to get just right. If you want the point to be able to hold its shape and not droop downward, then you might want to use a stiffer fabric. You could also sew a stiffer material into just the pointed section, like a piece of plastic or even some interfacing material. This will help it to keep its shape.
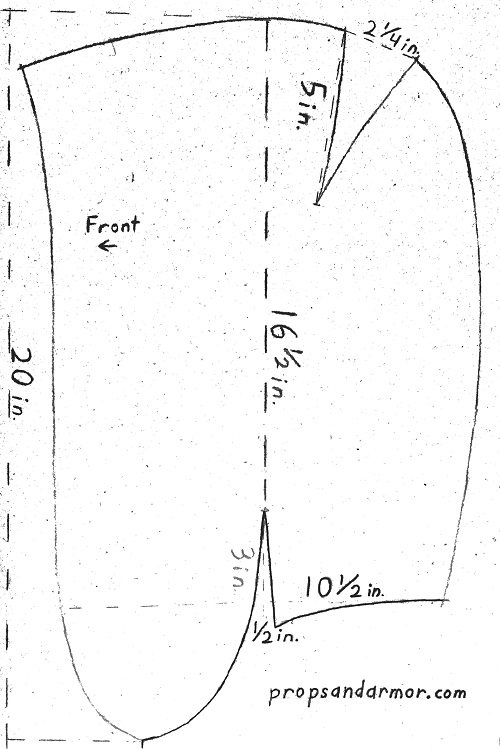
Hood With a Pointed Back
Some hoods have a noticeably pointed back, and sometimes even an extremely long point that extends backwards almost like a tail. For a simple pointed back, all you have to do is make the hood pattern square shaped. When you sew it all up, the corner will form a point.
If you want a very long point, then you can just extend the corner of the pattern out as far as you need to. A lot of medieval style hoods, sometimes called liripipe hoods, often have very long, extended points like that. You could even put some stuffing in it to give some extra definition.
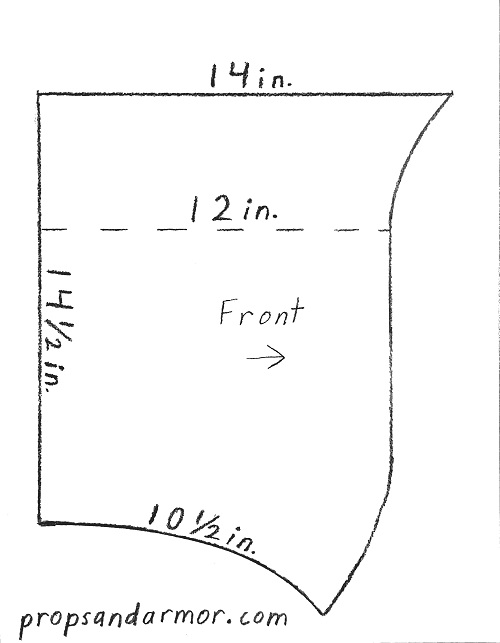
Hood with Attached Mantle

While we’re on the topic of medieval hoods, it’s worth talking about mantles, or capes. The vast majority of medieval hoods are depicted as having an attached piece of fabric that drapes over the shoulders. You can call this a mantle, cape, shawl, or whatever you want, but in this article I’ll refer to it as a mantle.
The pattern for the mantle can be integrated with the pieces of the hood, or it can be made from separate pieces of cloth. In my opinion, I think that it looks better when the hood and the mantle are cut and sewn separately and then joined together. If you have the fabric of the hood continue into the mantle without a seam, then it leads to bunching around the neck.
In some cases you might actually want that look, and I think it can work well especially with thinner fabrics. But if you’re using a thicker fabric, then in my opinion it’s better to make the mantle with separate pieces of fabric.
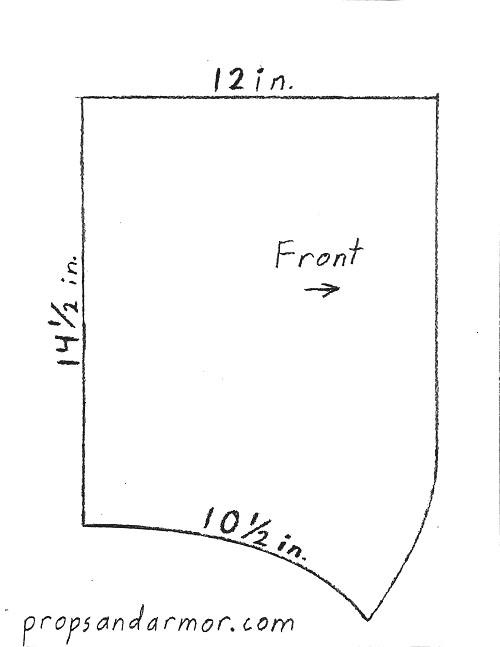
I have the pattern of the mantle showing one half of it, so you can cut it with the top part on the fold of your fabric. Or you can cut out two separate pieces and sew them together, which will give you a seam in the middle of the front and back. If you want, you can make a new pattern by joining the two halves together and then cutting it wherever you want your seams to be. I’ve seen many hoods with two diagonal seams in the front, which is a nice look.
Linings
If you’ve made your hood but you think it looks thin or lacks structure, then you might want to sew in a lining. A lining is just another layer of fabric on the inside. You can line your hood with whatever fabric you want, even the same fabric as the outside. This will give it another layer which will help to make it look fuller, give it support, and make it warmer as well if you want to. If you want to make it really warm, then you can add a faux fur lining.
Trim
A lot of times hoods are designed with intricate trim either around the opening of the hood or around the edge of the mantle. Often times it’s a floral or vine design, sometimes it’s lettering. If you have high resolution reference images then you can see the exact pattern.
In the context of the game or movie, the trim is probably hand embroidered. Doing this in real life would take a very long time though, so a lot of times people just paint it on. This isn’t a bad way to do it, but I think that there’s another easy way to replicate it.
You can buy embroidered trim in most fabric stores and online. It comes in many different widths, patterns, and colors. Unless the trim is of a very unique design, then you can probably find a trim that closely matches the trim on your source material. This way you don’t even have to hand paint the entire length of the trim, you can just sew it on. This method will give your hood a very authentic look, because it’s real embroidered trim.