If you’re looking for an exercise in patience, look no further than the art of making chainmail. Thousands of tiny metal rings, each one carefully formed by hand, woven and riveted together to form a strong and beautiful armor. It was used for thousands of years across the world, by many different cultures and in many different forms. This hugely important form of armor can be made in your own home with simple tools, and for not a lot of money. It does take a lot of time and patience though.
Modern stainless steel allows us to make a version of chainmail that won’t easily rust like it would have in the Medieval ages. Historically, mail armor had to be carefully kept with a layer of oil on it to prevent rust from forming. This meant that somebody had to constantly maintain the armor, and even make sure that it was stored properly when not in use.
With stainless steel, the armor can be worn and stored without the need for the rings to be coated in oil. You won’t need to worry about rust forming, even if you wear it in the rain. This is a huge benefit, and it will also increase the lifespan of the armor. Few examples of historical mail armor exist today because they rusted away, but if it was made out of stainless steel, the armor could potentially last hundreds of years.
A shirt of mail can be made of tens of thousands of rings. It would already be a long and tedious task to make one with mild steel, which is much easier to work with than stainless steel. To make riveted mail armor with stainless steel, it takes a few extra steps, which adds up in the long run. However, to me and perhaps to you, the benefits outweigh the extra cost in time.
In this article I’ll explain the process that I use to make riveted stainless steel chainmail. It took a lot of trial and error to make it work, so I hope I can save you from having to figure it out on your own.
Before we begin, just a word of caution. Be careful when working with tools, even if they’re not power tools. It’s a good idea to wear safety goggles and gloves, and any other protective gear that you’ll need. You can still injure yourself with simple tools like hammers and snips. Also, I make no promises about the capability of this armor to protect you from any harm.
With that out of they way, if you’re ready to start making your riveted stainless steel chainmail, let’s begin with the things you’ll need.
The Tools You Will Need
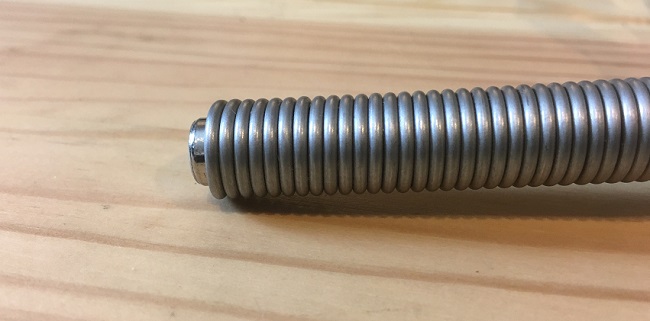
- The first tool that you’ll need is a rod to form the rings. This can be any width and thickness that you prefer. Keep in mind that if you choose a smaller diameter, you’ll need more rings to make your project. I went with an 8 mm wide rod, which will make that the internal diameter of my rings. You can make a jig to hold the rod, but all you really need is the rod itself and a handle to turn it.
- Secondly you will need a pair of cutters, modified to skip one row on your coil of rings. By skipping one row, you can cut the rings so that the ends will have a bit of overlap. That overlapping section will be where we put the rivet after flattening it. Technically you’ll need another tool to grind away part of the blades, but you have a few different options for that. I’ll go over how to modify the cutters a bit later in the article.
- Third on the list is a torch. You’ll use this to anneal the rings, which will make them softer and easier to flatten. Technically you can get away without using a torch, if you have a gas burning stove in your house or apartment. I have used a stove to anneal the rings, as you’ll see later. A torch just makes it easier and uses less fuel.
- Fourthly, you’ll need a flat piece of metal on which to flatten the rings. This can be an anvil if you have one, or the top of a vice, or even the head of another hammer if you have nothing else. Any reasonably strong, flat piece of metal should work. I use a little bench block with a piece of rubber underneath to lessen the noise.
- Fifth is the hammers. Any hammer will do, but if you don’t have any and you’re only going to buy one, I recommend you buy a ball peen hammer. These have a flat side and a round side, so you can flatten the rings and peen the rivets with one tool. If you don’t have a ball peen hammer and don’t want to get one, that’s fine. Any hammer will work. I started out with a claw hammer because that’s what I already had.
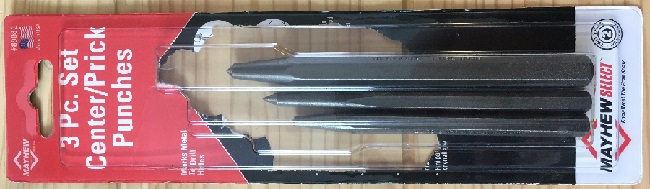
- Sixth is a center punch. This is for putting a slight dent in the rings to make it easier to drill the hole for the rivets later. You’ll need a punch that is meant for marking metal, not wood. The ones made for wood are too soft and will quickly become dull while barely leaving a mark on stainless steel. Even the tips of my punches, which are designed for metal, became dulled after a few rings, but they still work.
- Seventh is a drill press. You might have researched riveted mail and know that the rings were usually pierced, not drilled, to form the hole for the rivets. Unfortunately stainless steel is too tough to pierce through with a punch. I highly recommend that you use a drill press instead of just a drill, because it will give you much more stability. Using a handheld drill can result in the drill bit wandering off to the side, and there’s not much room for error with small rings.
- Eighth is the drill bit. I tried using cheap drill bits and they didn’t work at all. You’ll need a good quality drill bit that’s designed to go through hard metals. Even these can still get dull or even break after a while, so I recommend that you buy a few of them to start.
- Ninth is a file, or a belt sander, or anything to grind down sharp points. A lot of times, after flattening, the rings can develop very sharp edges or points. These can cause a lot of wear and tear on any garments that you wear underneath the chainmail, and it might make it painful to wear on thinner fabrics. To minimize that, it helps to have something to file or sand them down with. I just use a small file, but a belt sander or power file would definitely speed up that process.
- Lastly you’ll probably need some good pliers. These will just be for general use, like holding rings in place when you rivet them, and other things. Small needle nosed pliers work well, but some bigger pliers are handy too and they’ll give you a better grip.
Those are the bare essential tools that you’ll need to get started with this project. Of course you can use whatever you already have, and add to it whatever you want. You might be able to improvise or substitute things to suit your needs or situation.
Now that you know what tools to use, you just need some wire.
The Wire: What Kind, and Sensitization
Stainless steel actually comes in many different varieties. Each type has different percentages of different elements, such as Carbon, Chromium, Nickel, Molybdenum, and others. The Chromium content is what actually gives stainless steel its corrosion resistance.
The most common type of stainless steel wire you can find is usually type 304. 304 stainless steel is made of Iron, Chromium, Nickel, and Carbon. It’s easily workable and available in many different thicknesses. Is it the ideal type of stainless steel for making armor? Maybe not.
The main problem with 304 stainless steel is the amount of Carbon that has. It has enough Carbon so that when we anneal the rings, it can cause issues later on.
The annealing process involves heating up the rings until they’re red hot, and then letting them cool down slowly. Steel starts to glow red at around 900 degrees Fahrenheit, and that’s very close to the sensitization temperature of 304 stainless steel.
What is sensitization? First we have to understand that metals are made up of very small grains. Sensitization is the process in which the chromium in the metal forms chromium carbides at the grain boundaries. This results in a lack of chromium at the edges of the grains, which results in those areas being susceptible to corrosion. Corrosion around the grains weakens the structure of the metal.
The sensitizing temperature range of 304 stainless steel starts at 950 degrees Fahrenheit. It’s very easy to heat up the rings past temperature with even just a small torch. So how will this affect the strength and durability of the rings? That’s a bit hard to determine.
Before I learned about the sensitization process, I heated up my type 304 stainless steel rings to a bright red, which I’m pretty sure is within the sensitizing range. About four months later I haven’t noticed any rust, and they’re definitely not any weaker that I’m able to notice. It’s possible that the corrosion is all internal and the rings actually are weaker, and I just can’t tell. If you want to be safe and not have to worry about sensitization, there is another kind of stainless steel wire that you can use.
Type 316L stainless steel wire is also available online in 16 gauge thickness. 316L has a lower carbon content than 304, and is apparently immune to sensitization. It also has better corrosion resistance than 304.
Of course there are other variations of stainless steel that have low enough carbon contents that you don’t need to worry about sensitization, but not all of them are easily found online, or in the thickness needed to make chainmail. At date that this article was written, 316L stainless steel wire is available on amazon in 16 gauge thickness, so it’s very easy to acquire.
If you want to stick with 304 stainless steel, or that’s all you can find in your area, then it can still work. Like I said, I heated it into the sensitization range and haven’t noticed any adverse effects, but that doesn’t mean that they won’t start to show up later on.
You could still anneal 304 at a lower temperature. If you have an infrared thermometer, you can monitor the temperature of the rings as you heat them up to make sure that you don’t go past 950 degrees Fahrenheit. Doing that should prevent any sensitization.
To read more about sensitization in stainless steel, have a look at this website.
More About Wire: Thicknesses
When it comes to the thickness of the wire, there are a few things to consider. First of all, thicker wire means that your final product will be heavier, so thinner wire is better in that sense. However, if the wire is too thin, then it becomes very difficult to drill the hole for the rivet. Remember, because we’re working with stainless steel, we can’t just punch a hole through the rings. The hole for the rivet has to be drilled.
This means that the thickness of the wire has to be at least as thick as the drill bit that you use to drill the hole. After you flatten the ring, the metal will expand in width, leaving you a bit of room to work with. The wider you make the surface of the ring, and the smaller your drill bit, the more metal you’ll have around the edge of the hole. This will give you more wiggle room for any mistakes that you might make, and it will also make your ring stronger.
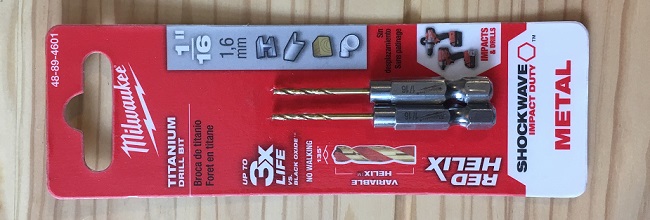
One thing that I’ve found is that it’s very hard to find a drill bit smaller than 1/16th of an inch. Most stores don’t carry anything smaller than that, at least not in the United States. If you try searching online for a 1/18th inch drill bit, you probably won’t find anything. I did get good results when I searched for a 1 millimeter sized drill bit, which is just under 1/18th of an inch.
It’s hard to judge the quality of a drill bit online, so you might want to just go with a brand that you can find in a store that you know and trust. That’s what I did, so I ended up with a 1/16th inch drill bit. This meant that I had to use at least a 16 gauge wire.
I decided to go with 16 gauge instead of something thicker because I didn’t want my finished armor to weigh too much. Based on my calculations, a mail shirt made of 16 gauge wire, with internal ring diameters of 8 mm, will already weigh close to 30 pounds. Anything more than that would be too heavy, so I went with 16 gauge.
This meant that I wouldn’t have much room to drill the holes, even after flattening the rings. If you look at historical examples with round rivets, you can see that there’s also very little metal around the rivet. It might seem like that would make the armor very weak, but in reality it’s still fairly strong. If it was strong enough for use in medieval times, then it’s strong enough for me.
Where to Get the Wire
I bought my wire online, because it was more convenient, but there are other places you can find it. Hardware stores usually carry it, as well as farm supply stores. A lot of times stainless steel wire is used for fences, so if there’s a store near you that sells fence supplies, they likely have stainless steel wire too.
If you want something special like 316L stainless steel wire, then you probably should order it online instead of trying to find it in a store. Same goes for if you want to use a different variety of stainless steel that you think would work well. There are online retailers that specialize in different types of steel that might have what you want.
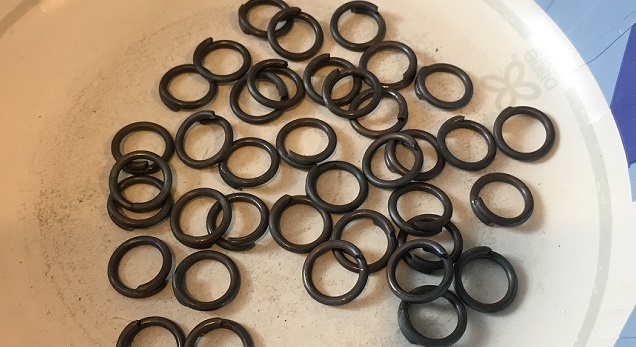
Forming the Rings
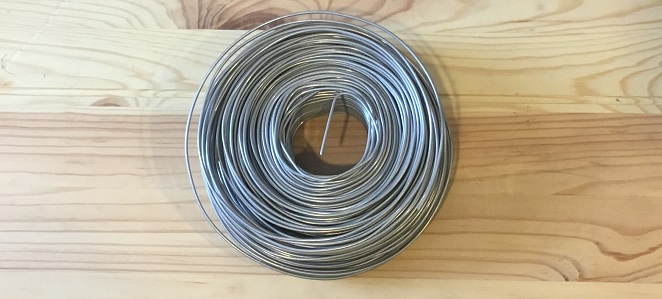
Once you have your wire, you’re ready to start forming the rings. This is a pretty simple process. All you have to do is wind the wire around a rod to form a coil. You can do this with a power drill, or by hand.
There are many tutorials online for building a jig to form the rings. Basically all it is is a wooden frame that holds the rod horizontally so you can more easily and steadily form the rings.
The most important part of forming the rings is to keep enough tension on the wire so that you make a nice tight coil. If you let gaps form in the coil, you’ll have to bend the rings into shape later on after you cut them. This can result in slightly malformed rings, which might not seem like a big deal, but it can make things a little harder in later steps. The best thing is to have tightly coiled rings.
Making The Cutters and Cutting Out The Rings
First you have to choose what kind of cutter you want to use. There are many different kinds of cutters or snips out there that will work well, but it also depends on the thickness of wire that you’re using. If you’re using something thin like 18 gauge wire, then really any kind of cutters will do. Once you get into 16 and 14 gauge, things get more difficult.
For thicker wire, you need some kind of mechanical advantage. This can either be in the form of longer handles, or compound cutters. In my case I went with a compound cutting tool, because it’s small and handheld, but still easily cuts through my 16 gauge wire. Remember, you’re going to be cutting through probably at least ten thousand rings to make a chainmail shirt, so you might as well make it easier on yourself by using some good cutters.
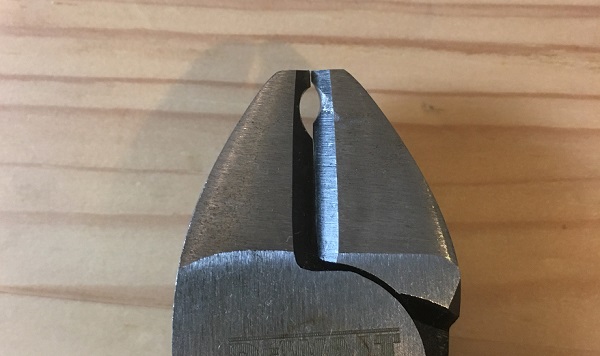
Next we need to modify the cutters or snips so that they skip one row on the coil and cut the row behind it. This makes it so that you can cut the rings out with an overlap at the ends, without uncoiling the rings. It keeps everything neat and tightly coiled and saves you the trouble of closing the rings after you cut them out.
To modify the cutters, we just need to cut away part of the blades and leave a little bit at the tip. The little part at the tip that’s left should be the same thickness as your wire, so that it will only cut one strand at a time. Unfortunately, this can be a difficult task because the blades are usually made of hardened steel.
I tried using a file to shape the blades, but all it did was dull my file. The best way to shape the blades in my opinion is to grind them down with a high speed rotary tool. Be very careful when you do this. Wear safety glasses, gloves, and whatever other safety equipment you might want, because the last thing you want is for pieces of sharp hardened steel to hit you. Also make sure that you hold onto everything very tightly, or even put the cutters in a vice so that they don’t snag and go flying.
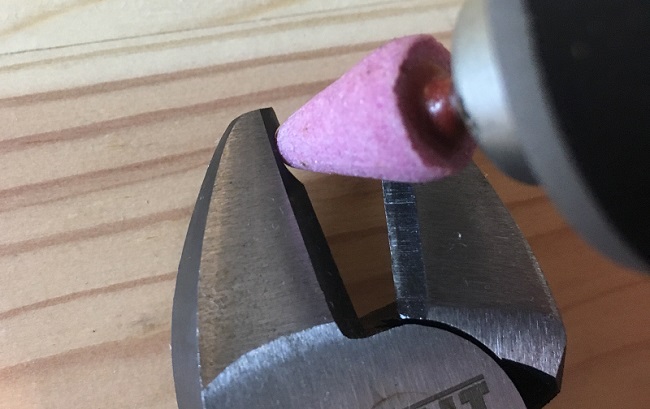
Measure out the thickness of your wire onto the tip of the blades and mark it. Then use your tool to grind away the blades up to that line. Grind out enough so that that part won’t touch the wire when you close the blades. It doesn’t have to be perfect. As you can see on my cutters, one of the tips is smaller than the other, but it still cuts just fine.
With these modified cutters you can easily cut out rings with overlapping ends without undoing the coil. I like to leave about 4 or 5 millimeters of overlap on the ends, because I found that that gives me a comfortable amount of space later on to drill the hole. Less overlap will leave you with less space to drill the hole, which is less room for error.
Now that the rings are cut out, we’re almost ready to start hammering, but first we need to anneal them.
Annealing the Rings
Annealing is the process of softening the rings by heating them up to a high temperature, usually red hot, and letting them air cool slowly. If you try and flatten the rings right after coiling them and cutting them out, you’re going to have a much harder time than if you anneal them first. It doesn’t take very long to do, and plus it will make you feel like a real blacksmith by heating up the metal until it glows.
If you’re using 304 stainless steel and you’re worried about sensitization, you might want to use an infrared thermometer to monitor the temperature. As long as you keep the rings under 950 degrees Fahrenheit, everything should be okay. They might not glow red very much, but it should still soften the rings a bit.
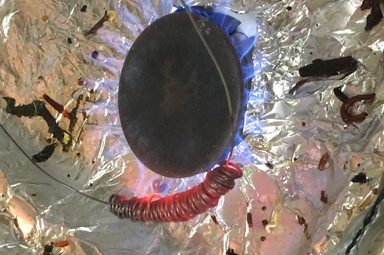
The standard annealing process involves heating up the rings either with a torch or whatever heat source you have until they glow red. I put the rings on another loop of wire, which makes it easy to hold and heat up a bunch of them at once. It’ll usually take about a minute or two for them to heat up to that temperature, and first they’ll change color from golden brown to blue, until they finally start to glow red.
I usually keep them at red hot for a few minutes, trying to get them all evenly heated. If you’re using a very hot torch, be careful not to overheat them. If they start glowing orange then you’ve gone too far.
After a few minutes of that, I hang them up somewhere safe to air cool until they’re cool enough to handle. Make sure that you hang them up in a spot where they won’t touch anything, or they could cause burns or catch things on fire. Also, the heat from them will rise, so make sure that you don’t hang them underneath something that could easily melt.
I usually let them cool for about 20 minutes to half an hour just to be safe. After that the annealing process is done and they’re ready for the next step.
Flattening the Rings
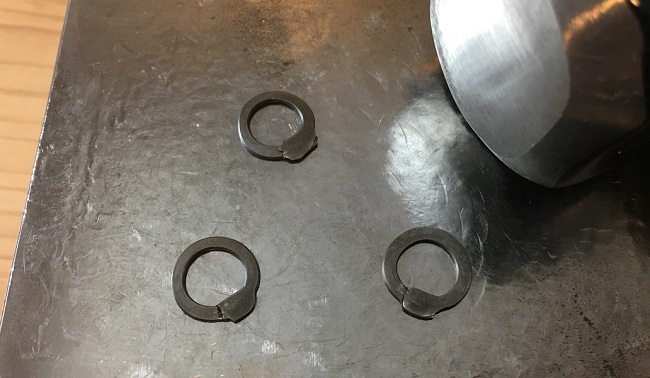
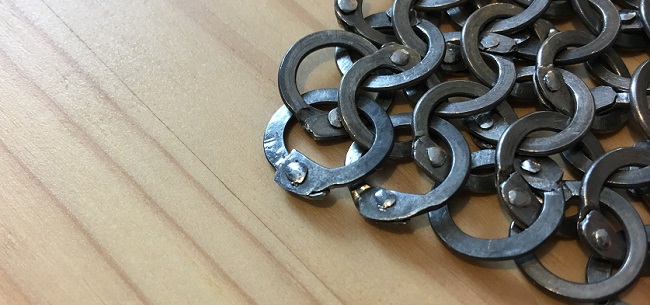
To make riveted mail armor, you have to at least flatten the overlapping portion of the rings. You don’t have to flatten the whole ring if you don’t want to. A lot of historical mail shows that they kept most of the ring round and only flattened the riveted portion. There are also examples of flat ring mail, in which all of the rings are flattened all around.
It’s up to you which style you want to make, but in my opinion it’s easier to just flatten the whole ring. Stainless steel isn’t like mild steel where after it’s annealed you can easily flatten it with a single hammer strike. It usually takes a few minutes of hammer strikes to flatten a stainless steel ring, and during that time the ring will move around quite a bit. It would be pretty difficult and even more time consuming to aim every strike only at the area where the wire overlaps. I’m not saying that it can’t be done, but it’ll take more time.
Another issue with flattening the rings is that you have to make sure that things to don’t get misaligned. A lot of times the overlapping wires will want to slide apart instead flattening down evenly. If the ends start to move around, you’ll have to adjust them back into place.
You can do this with a hammer by tapping the end that’s sticking out, or you can use a pair of needle nosed pliers to squeeze them back together. Either way works fine, but I usually just use the hammer because it’s easier than switching back and forth with the pliers while I’m hammering.
I like to flatten the rings until the overlapping portion is at least double or triple the width that it was originally. The flatter you make it, the more space you’ll have for drilling the hole later. If you make it too thin though, the metal will be very weak around the rivet. If you intend to use your armor in actual medieval combat, or any other activity where strength is required, then you might not want to make the rings too thin.
After your rings are flattened, we’re almost ready to drill the holes for the rivets, but there’s one more step that we have to do first.
Marking the Holes
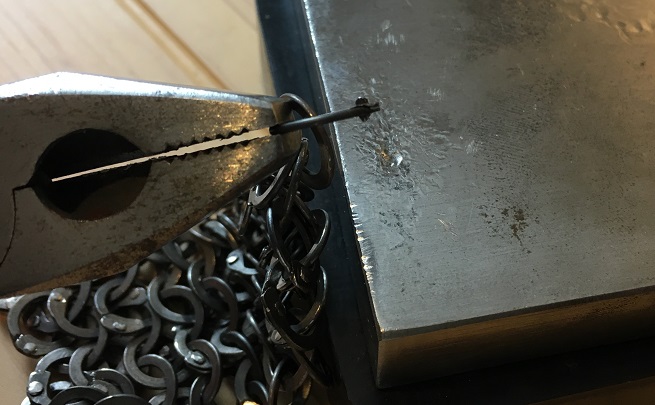
Before you drill the holes for the rivets, it helps a lot to mark the rings with a center punch. This will leave a slight dent in the metal for the drill bit to sit in so that it doesn’t wander too far off center.
Like I said in the tool section at the beginning of this article, it really helps to have a good quality center punch that’s designed for use on hard metals like stainless steel. Even these, unless you get a super good one, will likely get dull after a while. However, they’re still better than a soft punch that won’t even mark the stainless steel.
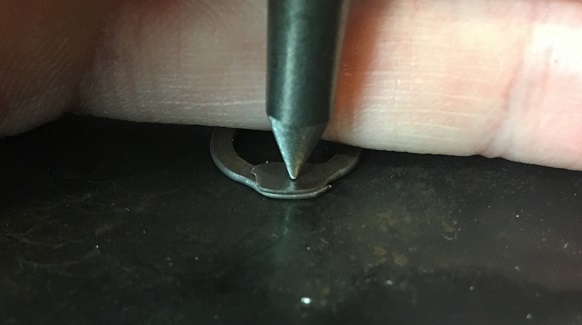
To mark the rings I usually put the rings on my rubber block instead of the steel block. This is so that if the punch slips off of the ring it will hit the soft rubber instead of the steel block, which I think helps preserve the tip of the punch. I also use a rubber mallet to hit the end of the punch because it’s a lot quieter that way. If you don’t have a rubber block you could use a piece of scrap wood underneath the ring. I don’t recommend that you do this directly on a desk or workbench unless you don’t mind it getting holes poked in it when the punch slips off.
To hold the ring in place you could use a clamp, but I found that those kind of get in the way. I just used the same hand that was holding the punch to hold the ring in place. It’s a bit tricky to hold such a small ring down firmly, and to keep the punch centered at the same time. The punch has a tendency to slip right off of the ring, so you have to hold it very securely. Once you get the hang of it though, there’s not much to it.
Smoothing Out Sharp Edges
This is a step that you might want to skip if you feel like you don’t have the time. During the flattening process, sometimes sharp points can develop on the ends of the rings. Depending on how far these stick out, you might decide that you want to file them down.
As you wear the chainmail, those sharp points will probably snag on the clothes underneath and eventually tear right through them. If you want to minimize that effect, then you should probably smooth out any sharp points or edges that develop on the rings.
Power tools will make short work of this job. Things like belt sanders, grinding wheels, or even power files will quickly grind things smooth. I don’t have any of those tools, so I just used a small file. That works just fine, but it takes much longer than a power tool would. I do it anyway just because I know this project is already going to take me over a year to finish, so a few extra hours filing doesn’t make a huge difference.
Choosing The Right Drill Bit
So because we’re drilling through stainless steel, we need a good strong drill bit that can handle it. I’ve tried using the cheap drill bits and they just end up breaking after barely scratching the surface of the metal. You need something that’s designed to drill through metal, and preferably through hard steel.
You don’t need to buy the top of the line, highest quality, made in the USA drill bits, although those would probably work pretty well. Chinese made drill bits can still be really good, as long as you buy the right kind. They can still break though if you use them wrong.
Drilling The Holes

Finally, we’re ready to drill the rivet holes. Now if you’ve never drilled through stainless steel before, there are some things you should know.
First of all, we need to drill at a very low speed. Stainless steel will easily work harden, which means that if we drill at a fast speed, the metal will actually get harder to drill through. This can result in the drill bit getting dull very quickly, or just completely breaking.
Secondly, lubrication is very important. Having some kind of oil, preferably a cutting oil, helps to reduce friction and heat, which will keep the metal from work hardening. If you don’t use oil, then even at low speeds too much heat can build up and you won’t be able to drill through the ring.
Once you have your good drill bit, your oil, and your drill press set to low speed, all you have to do is clamp your ring in place and drill the hole. Just clamp the ring to a scrap piece of wood so that it won’t move around as you drill, put a little bit of oil on the area where the hole is going to be, and slowly apply pressure until it starts cutting through.
You don’t have to use an actual clamp if you don’t want to. I use a pair of channel locks because I don’t want to clamp and unclamp the ring every time I drill. With the channel locks I just squeeze to hold the ring in place as I drill, and then I can easily let it go when I’m done.
It helps to press the ring into the scrap wood to make a little indentation in the shape of the ring. This will kind of act as a mold to hold the ring in place even better. This is easily done with a piece of soft wood, but if you’re using a piece of scrap hard wood then it might be more difficult.
One problem with using soft wood underneath the ring is that the ring can start to tilt down on the side that the drill is pressing on. This makes it more likely that the drill bit will slide off in the direction of the tilt. If you can, try to hold the ring as flat as possible as you drill, because that really helps to keep the drill bit centered on the ring. Once the drill bit slides off the edge, it usually ruins the ring, and it can also break the drill bit.
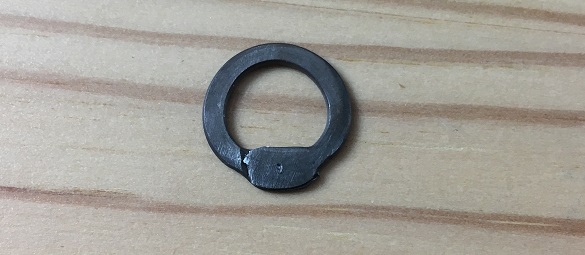
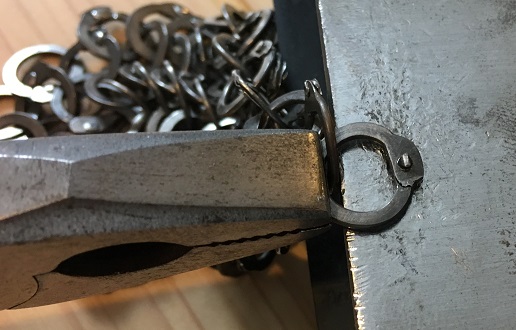
After you drill the holes, there might be some burs left over. These can be easily filed off so that they don’t get in the way of the rivets. Once you do that, and wipe off the excess oil, they’re ready to be riveted together.
Riveting the Rings
When it comes to rivets, you can either buy them or make your own. Buying them will save you time, and give you a more consistent look. If you make them yourself, it will probably take at least twice as long.
If you want to buy them, you can search online for “solid stainless steel rivets” along with the diameter of your holes. You can can get rivets with different styles of heads, like domed or flat.
To set these pre-made rivets, it helps to drill a shallow hole in a piece of metal first. Try to make it about the size of the rivet head. This is to keep the domed rivet head from flattening out, if you bought domed rivets. Then just insert the rivet into the ring, place the head of the rivet into that little pit, and hammer the other side down.
When you peen the rivet, try to aim for the edges of the rivet instead of the top. This will push the edges down first and give you more of a domed result, as opposed to just hammering it completely flat. The best kind of hammer to use for this is a ball peen hammer, because a flat hammer makes it harder to hit just the edge of the rivet. It can still be done, but a ball peen just makes it easier.
Stainless steel isn’t as malleable as mild steel, so the rivet won’t shape as easily. Even if you just hit the edges of the rivet, it can result in a relatively flat dome. This isn’t such a big deal, it’s just the way the metal works.
Making Your Own Rivets
If you’re like me and don’t want to buy pre-made rivets, then you can fairly easily make your own. To make my rivets I just annealed a bit of stainless steel wire, the same wire that I made my rings from, and cut out little sections to use as rivets.
The good thing about making your own rivets is that you can make them any size you want, short or long. I made mine very short, about 1/16th of an inch, or 1.5 millimeters. This gives me less metal to hammer to set the rivet.
To set my rivets I made a shallow little divot in my steel block for one end of the rivet to sit in, then peened down one side. Then I would flip it over and peen the other side. It’s a bit tricky to get both sides even, and a lot of times they ended up uneven, but as long as it holds the ring together it’s really good enough.
It’s best to try and peen the rivet so that the edges are as flush to the ring as possible, because those edges can be pretty sharp. If you leave the edges sticking up too high, they can catch on fabric or your skin.
Conclusion
That’s pretty much the whole process. The most efficient way to do this would probably be to do one step at a time, and finish all of the rings for each step. For example, you could form and cut out all of the rings at once, then anneal them all, then flatten them all, but when you have to make over ten thousand rings that just seems incredibly daunting.
What I’ve done is work in small batches of rings and take them through all the steps until they’re riveted together. Then I’ll start again with another batch of rings. This way I can at least see what the end product will look like without having to process thousands of rings first. I’ve found that it helps to keep each step interesting. It will also let you try out the entire process first and let you find out if you need to change anything.
That’s about all I have for you for this article. Good luck with your project, and don’t give up. Remember, even if it takes you a few years to finish your mail shirt, you will end up with something that will likely last for over a hundred years.