Shields are one of the most universal types of armor. Different cultures from all over the world have their own designs made of different materials. The most common materials used to make shields are wood, metal, and animal hides, but the construction methods vary greatly throughout the world.
One of the most iconic shield shapes is the heater shield. It’s a European design that evolved from the kite shield in the late 12th century. This type of shield was developed as plate armor became more advanced and the need for large shields decreased. You’ve probably seen heater shields in coats of arms.
In modern culture the heater shield is often used in medieval fantasy games and movies. For example, the Hylian Shield in The Legend of Zelda game series is very similar in shape and design to a heater shield.
Heater shields were sometimes slightly curved, probably to help deflect blows and impacts. Almost all of the modern fantasy heater shields that I could find examples for have some kind of curve to them. It’s more difficult to make a curved shield as opposed to a flat shield, but it’s such a common design element in fantasy shields that I wanted to show you how you can make one.
Materials and Tools
- 1×6 planks
- Wooden dowels
- Drill
- Table saw
- Jig saw
- Sander/sandpaper
- Canvas cloth
- Leather Straps
- 3/4″ wood screws
- Washers
This project will require some basic woodworking tools. That’s not to say that every tool needs to be a power tool. You could make a shield just like the one I made almost entirely with hand tools, it would just take a lot more time and be more difficult. The only power tool that’s almost totally necessary is a table saw, which is unfortunately a somewhat expensive tool that not everyone owns. If you don’t have one, maybe you can find a friend who owns one, or see if you can rent one.
The table saw is necessary to angle the edges of the boards while also keeping them perfectly straight so that they can be glued together without any gaps. There might be other ways to achieve this type of cut, maybe with a band saw, but the easiest and most efficient way that I’m aware of is to use a table saw.
Making the Pattern
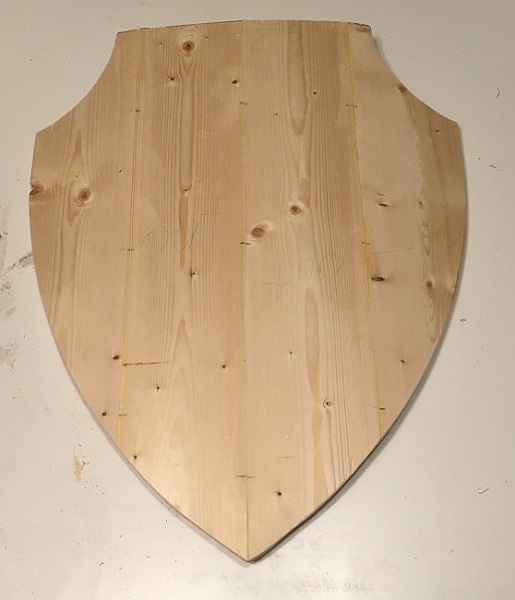
Before you jump into working with wood, it’s a good idea to figure out the exact shape and dimensions that you want for your shield. A good way to do that is to make a pattern. You can use any flat sheet material like paper or cardboard. Cardboard is good because it holds its shape better than paper. I used a sheet of corrugated cardboard and drew the outline of my shield on that first.
Now is the time to figure out how big you want your shield to be. Heater shields generally are only large enough to cover a person’s torso. I found that a height of 2 feet and a width of 20 inches is enough for me. The good thing about making your own shield is that you can customize it to fit your body, so if you want your shield to be bigger or smaller you can make it that way.
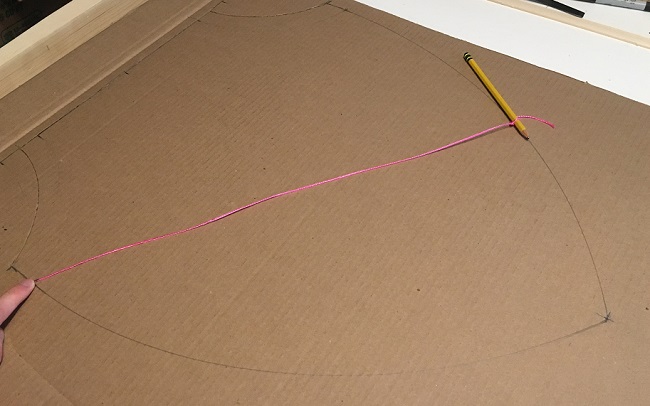
To make the spade-like point at the bottom of the shield, I tied a pencil to a string and held one end at one side of the shield, slightly below the top. The pencil starts at a point on the opposite side of the shield the same distance below the top. Then you simply draw a line arcing down, keeping the string taut and the pencil steady. Once you have one line drawn that goes past the middle of the shield, repeat the process for the arc on the other side. The lines should intersect exactly at the middle of your shield.
If you tried this and it made your shield shorter or taller than you wanted it to be, then you can adjust the point where you hold the end of the string. Either move it higher or lower to change the height. You could also increase the width of your shield, which would make it proportionally taller.
If you want to add any style elements, now is the time. I decided to add little cutouts on each side of the top of my shield. I just traced the top of a bucket to make the small curve. You could add a point to the top, or keep it flat, the choice is yours.
Cutting and Jointing the Boards
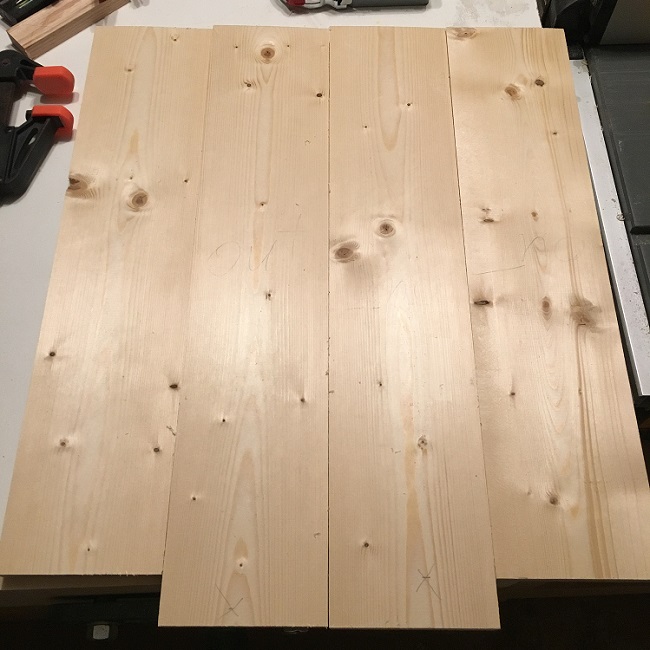
Once you have the dimensions of your shield figured out, it’s time to cut your 1×6 boards to length. I designed my shield to be 4 boards wide, so I cut 2 boards to that length. I cut the other two boards a bit shorter to go on the sides, because I knew that they would get trimmed later on. If you have a cardboard or paper pattern already made then you can see how long the side boards actually need to be. This just helps to save material.
You might want to check your boards for any defects like cracks or extreme twists or warps before you continue. A lot of times boards will have a slight twist, which is fine and won’t be noticeable in the finished shield.
One thing that you should check to see is which way the board is cupped, if at all. 1×6 boards will often cup slightly as they dry out, so you have to keep that in mind as you orient your boards. I like to make sure that the convex side of the board faces out, so that it matches the curve of the shield. If you accidentally orient them so that they concave side faces out, then your shield might flatten out or become wavy in the future.
After your boards are cut to length, the next step is to joint and angle the edges. Jointing is the process of straightening out the sides of boards so that they can be glued together without any gaps in the joint. A lot of boards from the store are warped, so if you don’t joint them then they won’t fit together very well when you glue them.
There are many methods to joint a board, but I used a jointing jig that I made for my table saw. Once one side is straight, you can cut the angle on the other side of the board. Just keep the jointed edge along the fence of the table saw and the angled cut should come out perfectly straight as well. Then you can flip it over and angle the other edge. Remember that only the two boards in the middle of the shield need both sides angled. The boards on the sides only need their inner edge angled.
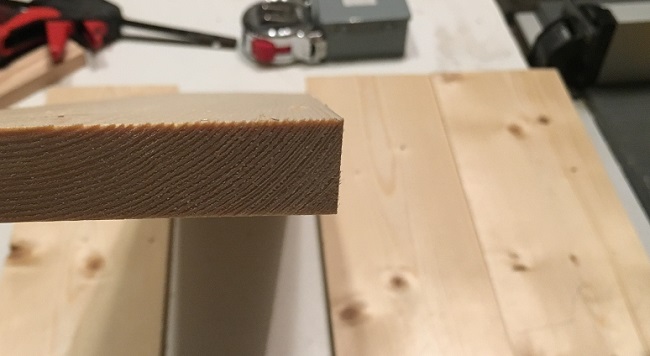
The angle that you cut the boards will determine how much of a curve your shield will have. I wanted my shield to have just a slight curve, so I angled each board at 5 degrees. If you want a more drastic curve then you could increase the angle. Keep in mind though that the steeper the angle, the harder it will be to smooth it over after you glue the boards together. If your angles are too steep then your shield can end up looking angular instead of curved.
Dowels

When I was thinking about how to glue the shield together, it seemed like it would be difficult without some way to keep the boards aligned. There are a few ways to solve this issue. I thought about building a frame or jig that I could clamp the boards to, but in the end I went with dowels. Dowels keep the boards perfectly aligned during glue up, and they also increase the strength of the joints, if only slightly.
Putting dowels into angled joints can be tricky, but not impossible. I made a super simple doweling jig from some scrap pieces of wood and it worked well enough. As long as you clamp the jig so that the hole is perpendicular to the face of the joint, it should line up perfectly with the opposite side when you join the boards.
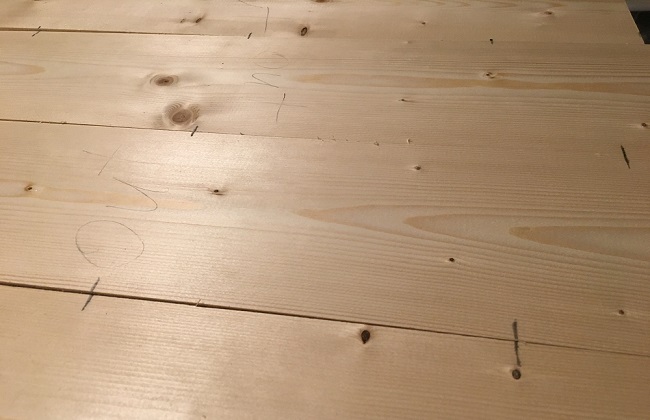
Before you drill the dowel holes, line up your boards in the exact orientation that you want them in. Then draw some registration marks across the joints. These will be where you drill the holes for the dowels. You might want to place your pattern over the boards so you can see where the excess will get trimmed off. Make sure to place your marks well within the outline of the pattern. If you don’t, you might end up cutting off or through a dowel.
You can add as many dowels as you want on each joint. The minimum would be two dowels, but I went with three per joint.
Once your holes are drilled, it helps to do a dry fit to make sure that everything fits together the way it’s supposed to. Put all of your dowels in place and make sure that you can fit the boards tightly together. This is the time to check if you drilled your dowel holes deep enough, and also that your boards are properly aligned. If they’re slightly misaligned it’s not a huge deal, because you can sand the joints flush after you glue it all together.
Glue Up
The glue up process on a curved shield like this can be a bit tricky. Applying the glue is simple enough; You just spread the glue along the joints, in the dowel holes, and on the dowels. The hard part is clamping it all together.
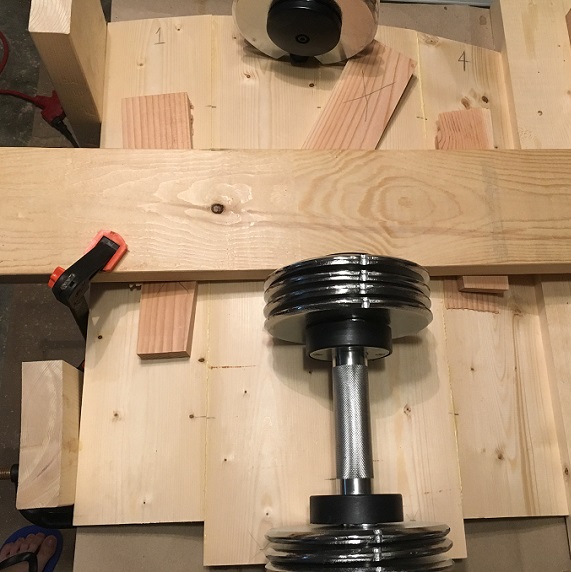
The point of clamping is to apply even pressure while the glue dries to keep the joints tight. If you just clamp the shield on the sides, it will cause it to bend slightly, throwing the boards out of alignment. The way to solve this is to apply pressure to the front of the shield as well as the sides.
If you have some straps those would probably work well. I didn’t try it myself so I’m not one hundred percent sure, but it seems like straps would apply even pressure to the sides while also keeping the top from bowing out too much. You would also need some way of keeping the straps from sticking to the boards, maybe by wrapping them in plastic or packing tape.
The method I went with was to clamp the board on the sides with a bench clamp, and then use boards going across the top to apply pressure from above. I also used wedges and some weights until I was sure that there were no gaps on any of the joints on the front of the shield. It’s not the prettiest method but it turned out well.
Make sure to wipe off as much of the excess glue as you can before it dries, because it can take a long time to sand off later. A wet rag works well, or you can scrape it off. I couldn’t really reach the back of my shield after I clamped it together, so it took much longer to sand the back compared to the front.
Let the glue dry for at least 12 hours, usually over night, and it should be ready for the next stage which is cutting out the shape.
Cutting To Shape
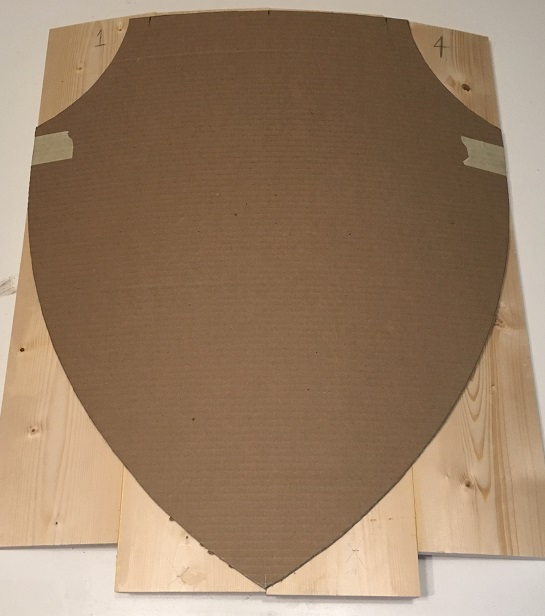
After you free your shield from the clamps, the next step is to cut out the shape of the shield. Before you do that though, you need to trace the outline of your pattern onto the boards. Center it as well as you can and maybe use some tape to hold it in place while you draw the outline. Once you have the outline traced, you’re ready to cut it out.
The best tool for this is probably a jig saw. It lets you follow the line while also allowing you to maneuver on the curved surface of the shield. You could probably use a band saw if you don’t have a jigsaw, but the band saw would need to be large enough to accommodate the width of the shield. It would also be tricky to cut out the shape while keeping the band saw blade perpendicular to the surface of the shield. That’s why the jig saw is easier in my opinion, because you can adjust the angle of the blade easily in your hand to follow the curve of the shield.
The type of blade that you use is also important. A fine toothed blade will help to reduce tear out, because some of the cuts you’ll be making will go across the grain. If you try to use a coarse toothed blade on those cross grain cuts, you’ll get some pretty bad tear out. I know because I started with a coarse toothed blade and got some tear out before I switched to the fine toothed.
Sanding
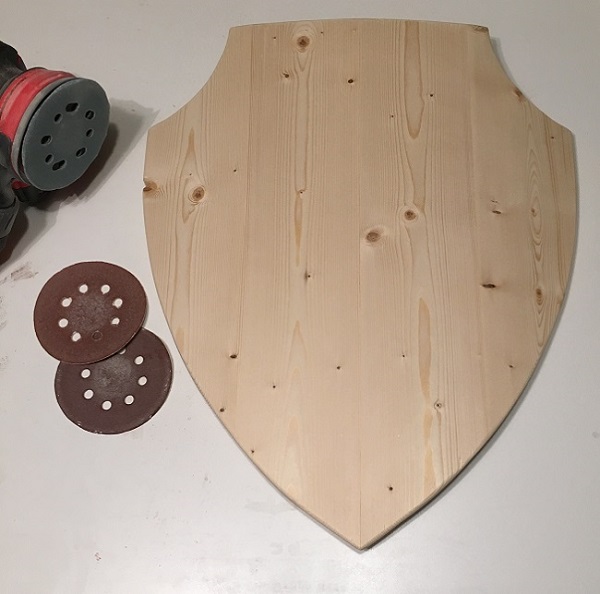
Once you have your shield cut out, you’re ready to sand it. A random orbital sander is a handy tool to have for this, because it’s a lot faster than sanding by hand. If you don’t have one, you might want to consider picking one up. The cheaper models usually cost around 50 US dollars or less. It’s a very small investment considering how much you’ll use it for any woodworking projects you do in the future.
The sanding process usually starts with a coarse grit like 80 or 60 grit sandpaper. If you have a lot of leftover dried glue then you might want to use a 40 grit sandpaper, because it will go through it much faster. Be careful with 40 grit though, because it will leave a very rough surface that can take a while to sand smooth later on, so I would only use it on small areas of dried glue if at all.
During your first pass with the 80 or 60 grit paper, try to smooth over the joints of the shield to get rid of any sharp angles. This will help to give the shield a gently curved appearance instead of an angular one. When you’re done the joints should barely be noticeable.
Now is also the time to round over the edges of the shield. Usually you don’t want to leave the edges of the wood sharp, because they can easily be dented or damaged. Rounded edges are much more durable and they won’t easily splinter if you bump the shield against anything. Just run your sander over the edges until they’re as rounded as you want them to be.
Once the entire shield has been sanded to 80 or 60 grit, repeat the process with the next highest grit, usually a 120. This next pass should go much faster than the first one, because the first one already smoothed out the joints and edges. Just sand it until you feel the surface become smoother than the last grit.
You can sand your shield to any grit that you want, but I decided that 150 grit was smooth enough for mine. A lot of woodworking projects are sanded to 220 grit but I didn’t see any need to make my shield that smooth. Especially if you intend to cover your shield later on with cloth, it’s not necessary to sand all the way to 220.
Finishing
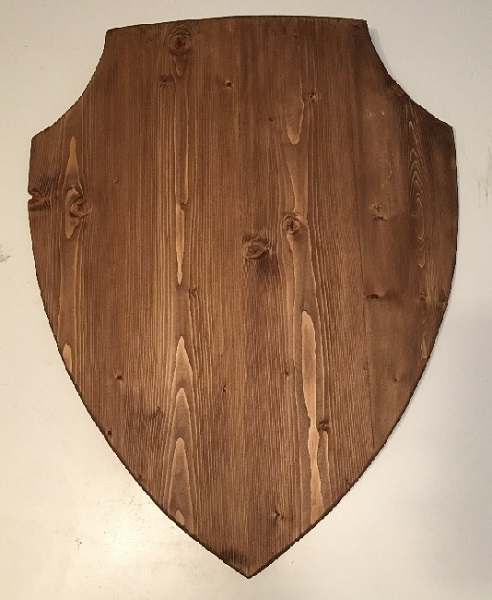
The finishing process is where you can go in any direction that you want. There are many different methods of finishing your shield, and ways that you can decorate it. You could stain your shield or leave it its natural wood color. Historically, a lot of shields of this type were painted with the coat of arms of the wielder.
For my shield I decided to stain it a darker color and finish it with a coat of satin polyurethane. I’ve done this finish a few times before on other projects so I felt confident that I could use it on this shield. In the future I’d like to make another shield with a more traditional finish, like painting a design on the front.
If you want to paint your shield, you could paint directly onto the wood, but it might not stick very well. It would help to apply a primer first and then paint on your design or coat of arms. In historical examples they would sometimes glue a sheet of canvas or parchment to the front of the shield and then paint that with a gesso. This would give a very nice surface for the paint to adhere to, as well give a bit of reinforcement to the shield.
To protect the edges of your shield from impacts, you could nail strips of leather or rawhide along the edges. This is one method that was apparently used in medieval times. Another method would be to make metal covers to go along the edges, but that would require a lot of work and some smithing skill. Metal edge guards would also increase the weight of the shield.
Straps and Padding
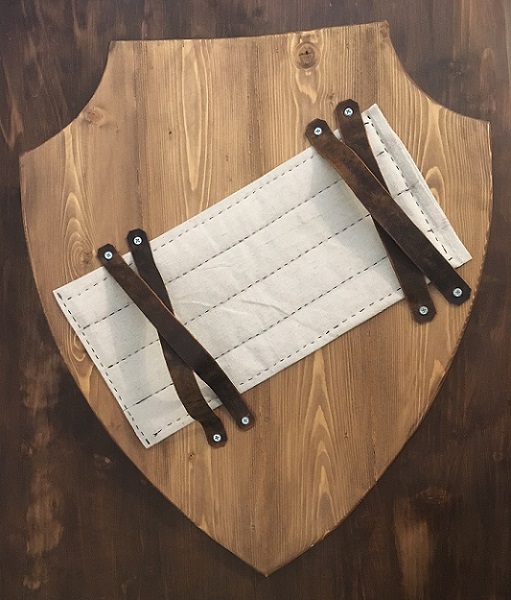
Historical artwork of heater shields show that they had leather straps on the back for the wielder to put their arm through and grab onto. They also show a pad, probably made of cloth or wool padding, that the wielder’s arm would rest against. This would presumably protect the arm from impacts. There are also depictions of a longer strap that might have been used to carry the shield on the wearer’s back.
The straps are usually positioned so that the wielder’s arm is at a slight angle on the back of the shield, as opposed to perfectly vertical or horizontal. This makes it so that the wielder can hold the shield in front of them with their arm at a comfortable angle. The angle appears to be between 30 and 45 degrees.
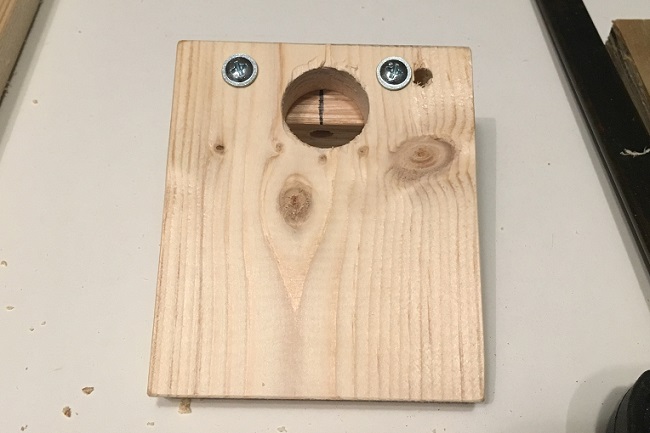
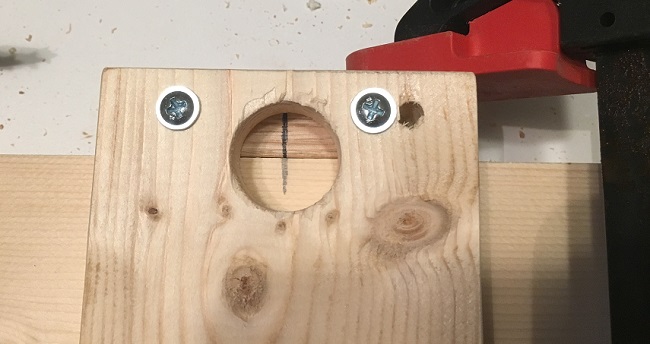
To attach the straps, you can use either screws or nails. Just make sure that they’re short enough so that they won’t penetrate through the front of the shield. I used 3/4 inch wood screws for mine because I thought that they would hold better than nails. I also put a washer on each screw to better hold the leather.
Whether you use screws or nails, you might want to pre-drill the holes to avoid splitting the wood. Usually splitting happens if you screw or nail close to the edge of a board, and as you can see in the picture, some of the screws are fairly close to the edge. I pre-drilled all the holes just in case.
You can see that I doubled the straps on my shield, so that there are two straps for the hand to hold onto and two straps for the forearm. This is just to reduce the chance of failure. If one strap breaks or a screw pops out, there will be another strap to keep the shield attached to the arm.
To make the arm pad I just folded a small towel into a piece of canvas and sewed it together. The pad was a bit to thick to put through my sewing machine so I had to stitch it by hand. There are stitches going through the pad to keep the layers from shifting around over time.
You can attach the pad either with screws, nails, or just glue. I decided to glue mine into place because I thought that would hold it well enough. Unlike the straps, the padding doesn’t have to withstand any force pulling it away from the shield.
If you want some extra padding and don’t mind being historically inaccurate, then you could use a piece of foam for the arm pad. You can cover it in cloth so that it looks medieval, but still have the benefits of foam.