As resin 3D printers become more affordable, with some printers in the $300 to $400 US dollar range, more and more hobbyists like myself are buying them to print miniatures for our tabletop games. Resin printers are ideal for printing tabletop minis because they can print every fine detail of the pieces. However, if you orient a miniature on the print bed in the wrong way, then a lot of detail can be lost, or the print can fail completely.
What is the best way to orient a miniature for printing in a resin 3D printer? Generally it’s best to orient the miniature in as upright a position as possible, so that there is minimum overhang. If there is a highly detailed portion that you don’t want supports to touch, then print that part so that it’s upright or facing away from the print bed.
In this article I’ll explain how I printed a few miniatures for my tabletop game in different orientations and how it affected them. Like I said, this is just my hobby and I’m by no means an expert, but I hope that you’ll find something useful. Also, I’ll leave links to all the Thingiverse pages at the end of this article for the models that are pictured.
Determining the Angle
The main thing to worry about when deciding how to angle your miniature is how the support material will affect the finished piece. Every spot that the supports touch will have a little bump when the support is removed. This means that whatever detail was underneath that spot where the support touched will be lost after you remove it and sand away the residue. For that reason it’s good to minimize the amount of support needed when you choose how to orient your miniature.
For a lot of miniatures, if they are in a standing position, it’s fine to print them in the default position with their base flat on the print bed. Because they’re standing up straight, their body won’t need support. Sometimes their arms, clothing, or weapons will need support if it overhangs steeply enough, but a bit of support material usually won’t mess up the detail too much if it’s in those areas.
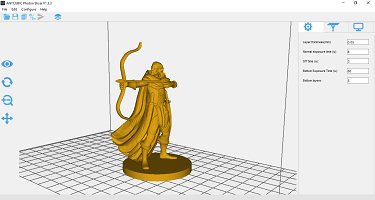
I’ve seen some sources say that you should tilt the mini so that it’s front is facing away from the print bed, which will keep it from needing support and therefore preserve the detail. But doing that would cause support to needed on the back of the mini, which sometimes has some details that you also don’t want to mess up. I’ve found that it’s better to just print it standing straight up, so that the body supports itself, and that way the least amount of support is needed.
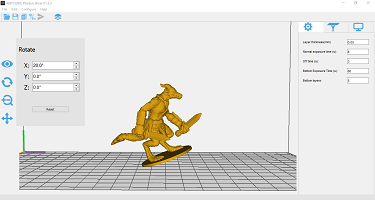
For other cases where the mini is in a crouched or leaning position, sometimes it can help to tilt it so that it’s body is in a more upright position. You only really need to adjust it if it would need support if you printed it in it’s normal position. The body of minis tend to have a lot of detail, like clothing, belts, and straps. I prefer to rotate the mini so that those details won’t have any supports touching them.
The Base
Most miniatures that I’ve found online on sites like Thingiverse have a base attached to the figure. The base is usually just a flat circle or square that the actual figure stands on. When you print the mini without any rotation, the base sits flat on the print bed. If you need to tilt the miniature at all, then the base tilts with it.
The problem with the base tilting is that it will likely need support. I’ve found that printing a flat piece at an angle, only held up by supports, can cause deformation unless you use a lot of support. When I stuck to the default number of supports that the slicer placed for me automatically, the bases came out warped and bumpy.
Clearly the best way to print the base is to have it flat on the print bed. Every time I printed it like that, it came out smooth and perfect, and there was no issue with separating from the print bed either because it’s not very wide. If you can print your mini with the base flat then that’s ideal, but if you need to rotate the mini there’s still a way you print the base flat.
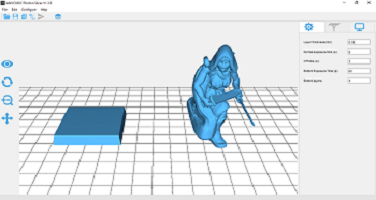
All you have to do is use a program like MeshMixer, which is free, and cut the base off of the model. Once you have them separate, you can print the mini in whatever orientation you need to, and still print the base flat by itself. Some models come with an optional separate base, which I guess is specifically for this reason, but if the not then it’s easy to do yourself. I’ll link to a good video that explains how to use Meshmixer to split models into separate pieces.
Supports
Because tabletop minis are so small and can have such fine details, it makes sense to use the smallest supports you can so that you don’t mess up those details. For the most part this is true, because a smaller support will leave a smaller mark, but they can also be super flimsy.
Some of my minis that I printed came out a little wonky in some spots because the supports weren’t strong enough, and things shifted around. In the slicer software they might look substantial enough, but when you go to print they might not be enough. If they’re too thin then they can break, warp, or separate from the piece while printing.
It might be worth it to use the smallest supports you can if your mini is highly detailed and doesn’t really need much support. The only way to really know is to test it out on your specific printer, because printers and slicers are different. Yours might turn out better than mine.
Medium sized supports can work fine if they are strategically placed, which is usually over an area of the mini that is going to be flat or smooth. Heavy duty supports usually aren’t necessary on such small prints, so you probably won’t need to use them.
Resolution
I usually print my minis at 0.05 millimeters resolution, and it doesn’t take too long to print them, usually about an hour and a half. You could go down to 0.01 millimeters per layer, but that might increase the print time significantly. Then again, since minis are so small, the total print time might not be too long for you.
Printing Large Minis
If you need to print a bigger miniature, like a dragon or other large creature, then the same advice generally applies. It’s best to orient the creature so that it’s as upright as possible, or so that it’s longest section is perpendicular to the print bed. This will save it from needing a lot of support along it’s body and possibly obscuring details like fur or scales.
If the creature is too big for your print bed no matter how your rotate it, then you can split it into multiple parts. There are a few different programs that can do this, but I like to use Meshmixer like I said above. Just watch that video and it’ll explain all you need to know to properly split your model into smaller parts.
Final Thoughts and Some Links
It’s really amazing that there are so many free models for miniatures available online for us to print. I hope that this article helped you so that your pieces come out in the best possible quality.
Thingiverse collection containing the bard that I used: https://www.thingiverse.com/thing:2434314
Thingiverse collection containing the elf ranger I used: https://www.thingiverse.com/thing:2435041
Thingiverse page with the ranger: https://www.thingiverse.com/thing:2805308
Thingiverse pages for the kobolds: https://www.thingiverse.com/thing:3283015/files https://www.thingiverse.com/thing:3283019/files https://www.thingiverse.com/thing:3283029/files
Thingiverse model for a knight that I scaled down to miniature size: https://www.thingiverse.com/thing:2632540/files