You’ve set up your 3D printer perfectly, so why do your prints still look bumpy or uneven? You tightened the belts, leveled the print bed, and set the extruder to the right temperature, but your prints are still turning out less than perfect. It might be because of the table that you have your printer sitting on. If you have your printer set on a flimsy, wobbly table, then the vibrations from your printer will be transferred to the table, causing the whole thing to wobble. These movements can affect the smoothness and details of your 3D print.
How can you increase the stability of your 3D printer? You should have your 3D printer set up on a heavy weight, sturdy table, and have something underneath the printer to absorb vibrations. Slowing down the print speed can also help.
I’ll go over each of these aspects and some of my thoughts and experiences.
The Table
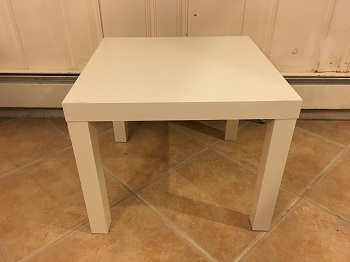
For a long time I had my 3D printer on a little square table that was only about a foot and a half tall and just under two feet wide. I didn’t think about it much at the time because that’s just what I had. It was also a very light table as it was actually made mostly out of cardboard. The short height made it so that I had to squat or kneel down every time I worked on the printer, which was uncomfortable and inconvenient. Because it was lightweight and not very sturdy, it would wobble as the printer worked and those movements would be reflected in the quality of the printed piece. At the time, when I had just started 3D printing, I didn’t realize how much my set up was lacking. To be fair it functioned okay, just not as well as it could.
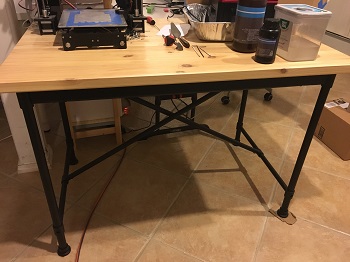
Eventually I upgraded to a much sturdier table, which is the one I use now. This one is 43 by 27 ½ inches wide with a top made of solid wood, and it has metal legs with cross bracing to improve stability. The feet of the table also have rubber pads at the bottom which help to absorb vibrations. It is exceptionally rigid and has almost no wobble to it at all when you bump it. It’s heaviness also makes it much harder to move, which is good for 3D printing, but not so good if I ever need to move it upstairs.
So there are trade offs when you choose a table for your 3D printer. It’s good to have something heavy duty and strong, but if it’s too heavy you won’t be able to move it. For some people that might be fine, say if you have a workshop with a fairly permanent layout, you could get a very heavy workbench and not have to worry about ever moving it again. But if you move houses a lot or just like to rearrange your furniture every now and then, then it’s important to have something light enough that you can move it relatively easily.
The reason it’s good to have a heavier table is that the vibrations from a 3D printer won’t affect it as much as a lighter table. While my old table would wobble and shake from the movement of the printer, the table I use now is too heavy and strong to be affected by it. When the table stays perfectly still, the vibrations are limited only to the printer, instead of being prolonged or worsened by the shaking of the table. Just upgrading the table is enough to result in noticeably smoother prints, but can we improve it even more?
Padding
Some printers, like mine, don’t have any rubber feet or any kind of padding on the bottom. The hard plastic frame simply rests on whatever surface your table is made of. For smooth surfaces, this can cause issues like the printer sliding around over time. The first table I used had that problem. Luckily my printer never fell off the edge, but theoretically I guess it could have if I left it alone for long enough.
If your printer doesn’t have any padding, it might help to add some. Padding can help absorb vibrations, which should reduce any wobbling in the frame of your printer and improve print quality even more. It can also keep it from moving around on the surface by increasing the grip that it has on the surface. It can even reduce the noise from your printer in some cases.
So what kind of padding should you use? Well, there are many options.
- Rubber
- Rubber feet can be installed, usually by gluing them to the corners of your 3D printer’s base. Depending on the stiffness of the rubber, these can vary in the amount of vibrations they can absorb.
- Rubber mats can be purchased in varying thicknesses as well and just slide underneath your printer, no installation required. A mat will accumulate dust over time and need to be cleaned as opposed to feet.
- Foam
- Foam comes in many shapes and sizes. I would recommend some kind of closed-cell foam like EVA foam because it’s durable and easy to clean. Craft foam can work, but over time will compress due to it’s thinness and lose it’s padding.
- Yoga mats can work well, just cut a section out to fit the base of your printer. They’re made of EVA foam and have textured surface to offer more grip than just smooth foam.
Printer Speed
The main cause of vibrations from 3D printers comes from the print bed and the print head moving and changing directions. Because velocity and momentum are directly proportional, it makes sense that the faster you set the print speed to, the more momentum the parts have. This makes for greater vibrations at higher print speeds because the moving parts have more force behind them. Simply put, slower print speeds will make your 3D printer vibrate less.
The range of print speeds for 3D printers generally ranges from around 40 millimeters per second at the slow end, up to around 150 millimeters per second at the very high end. Usually the outer layers are printed slower than the infill layers. That allows for smoother, more controlled layers on the surface.
A lot of 3D printer slicers will allow you to set the printer to your desired speed. You could just set everything to around 40-50 mm/s, and that would greatly reduce any vibrations, but on larger prints that would increase print time hugely. In my experience, the thing that causes the most vibration is when the printer changes directions very quickly, which usually happens when it is infilling a small area, or printing small support structures. Setting the infill speed to about ten percent faster than the outer layers will reduce the print time, and as long as you don’t set it too high, the vibrations shouldn’t be too great.
One thing about print speed is that there are other factors to consider when adjusting it. If you know that the print path for the particular piece you’re printing doesn’t have a lot of sharp changes in direction, then the print speed won’t affect the vibrations very much at all. On the other hand, if it is a very intricate piece with a lot of sharp changes, then a slower print speed would probably be advantageous.
Conclusion
If you get a good sturdy table, add some padding underneath your printer, and adjust the print speed to an appropriate level, then your prints should turn out excellent. That is, assuming that everything else is in good working order.
Related Questions
How do I reduce the noise from my 3D printer?
A lot of the noise of 3D printers comes from the stepper motors, but if there are loud rattling sounds then it might be because its movements are causing it to vibrate on the surface of the table it’s sitting on. Like I mentioned above, having some padding underneath absorbs vibrations to not only increase print quality, but also reduce noise.
What speed should I print at?
It depends on the piece that you’re printing and the quality that you’re looking for, along with the capabilities of your printer, but 60 millimeters per second is generally a safe speed.